Exporting and sharing artworks
Introduction
With Artshell, your Artworks reach your target audience quickly and in a personalized way. Share your Artworks links or email, or export them as PDFs or Excel files. Customize each sharing and export to suit your needs, choosing with complete autonomy which information from records should be included.
Check out some examples of exports you can create with Artshell:
Within each sharing option, you'll find toggles— buttons that you can turn on or off to include or exclude specific features or associated details.
Watch the short explanatory video below:

Select the Artworks export and share
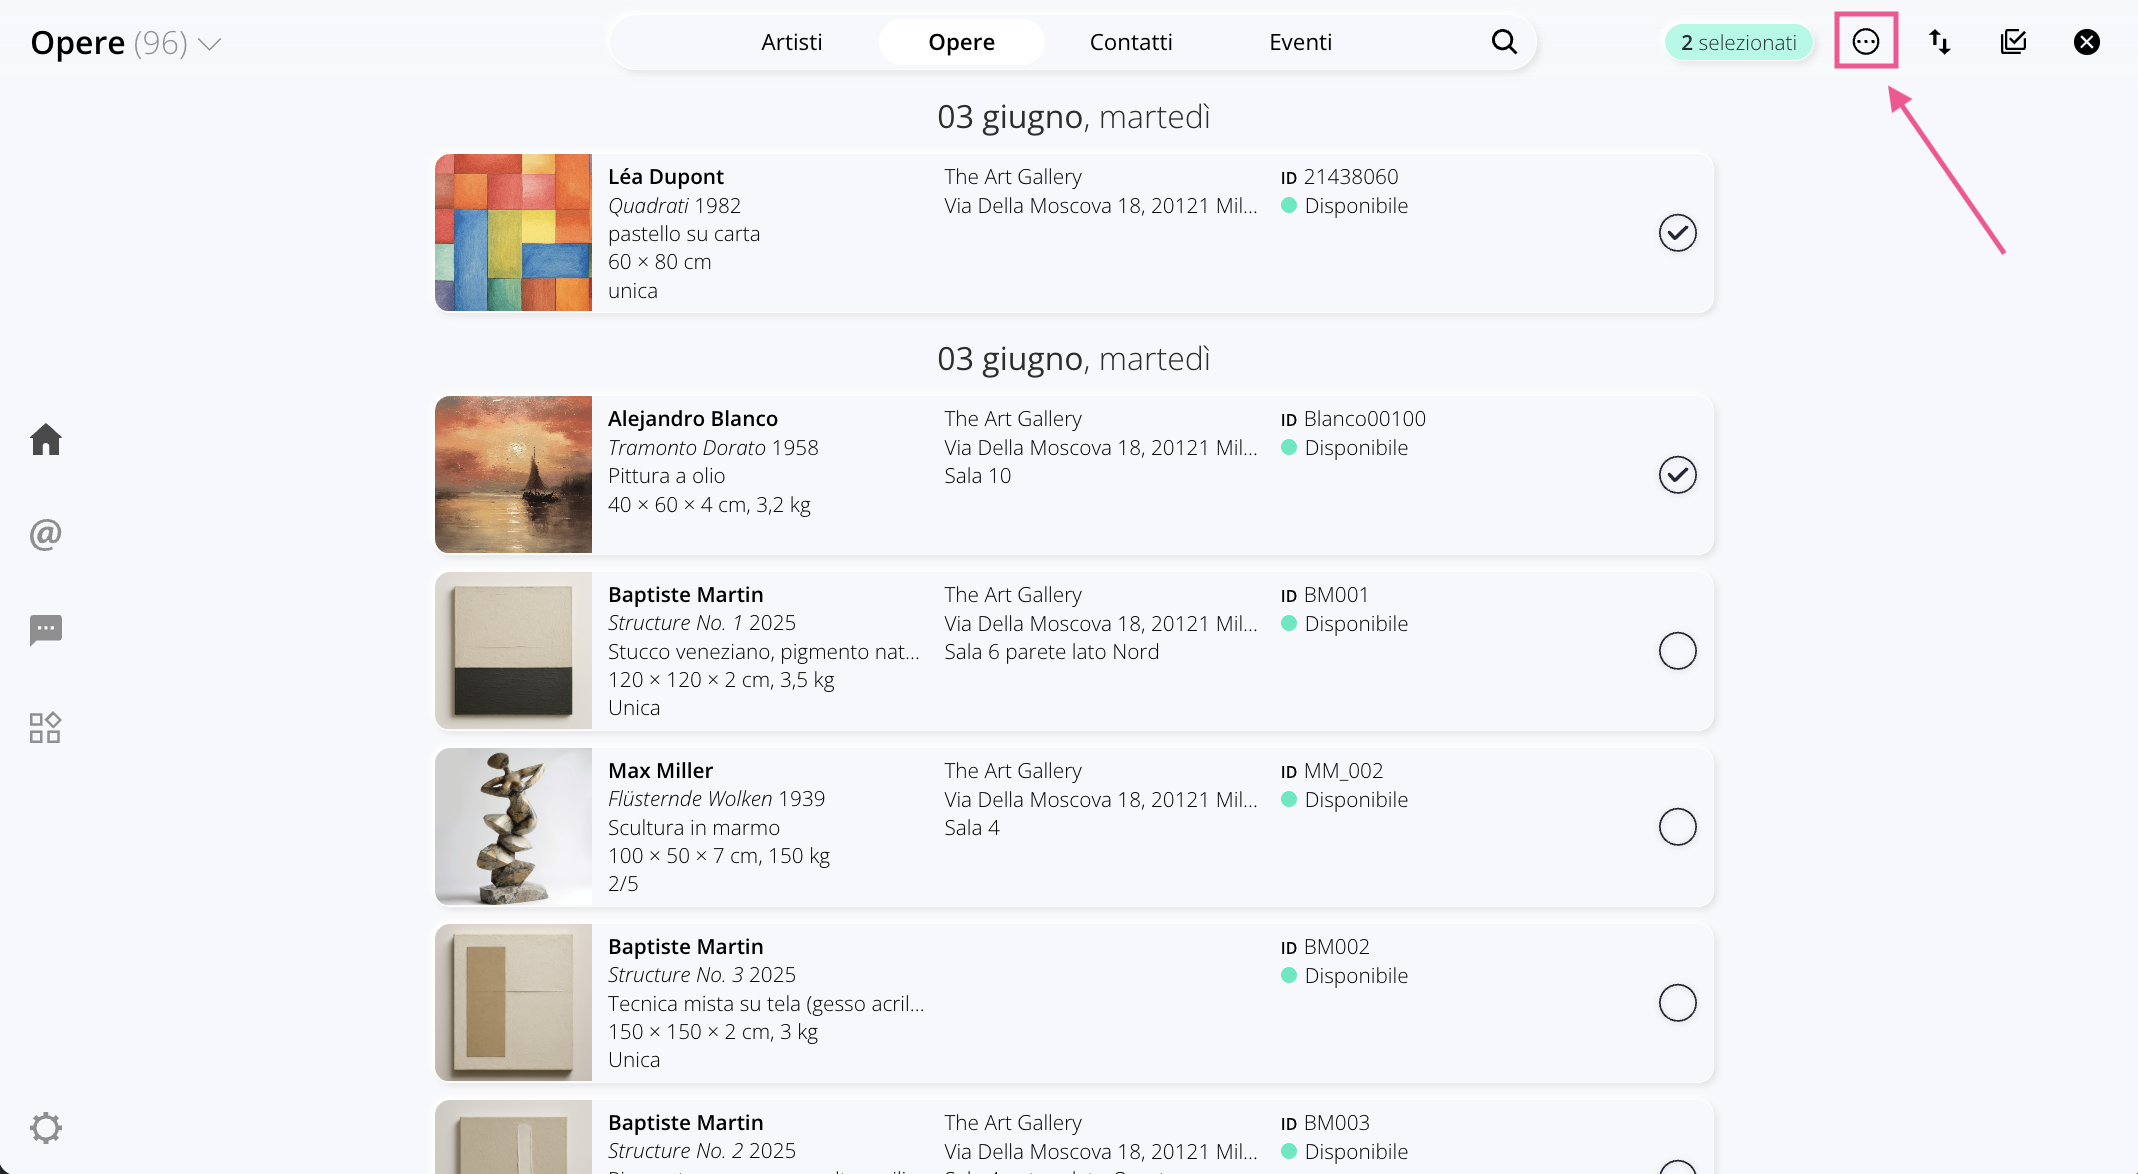
The export always starts from the Selection of Artworks by clicking the icon . For a more detailed explanation of this feature, see the article "Introduction to the Artworks section."
Once you've selected the Artworks, the Manage panel appears automatically on the right, containing sharing and export options.
If the panel does not appear (for example, because of a small screen size), click the icon top right:
This article focuses on the first option in the Manage panel, Export
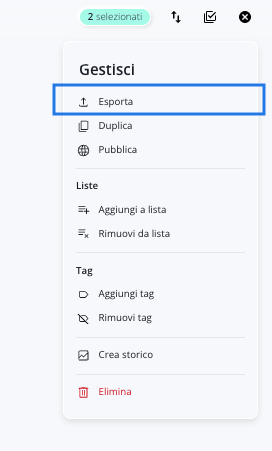
It allows you to:
Share your Artworks
After selecting the Artworks want to share, choose either "Link" or "Email."
Click on the titles below to expand them:
Share via Link
The "Share via Link" feature allows you to share Artworks via a public link that anyone with the URL can view.

Use the options on the left to explore the different sections and customization settings. On the right, you’ll see a real-time preview of the link that updates as you make changes. If your screen is small and the preview isn’t visible, click the “Open Preview” button at the bottom to view it.

General Settings
In this section, you can select the language and customize the link’s text content, such as the title and introductory text. In the preview on the right, you’ll see these changes update automatically in real time.

This address can be configured and modified in the Network Settings . To ensure that user data is handled in compliance with regulations, make sure you have set up your privacy policy and terms and conditions in the Settings Panel.
Choose the cover layout and background, the title style, and the graphic layout of the Artworks.
Metadata
Enter the title, description, and preview image that will be displayed when your link is shared in chats, on social media, or on other websites.

From this section, you can edit your selection without having to go back to the Artworks section. Click on Manage selection to open the side panel on the right, where you'll find the complete list of Artworks your Artworks section Artworks can add or remove the ones you want to include. To view only the Artworks , Click on the green bar at the top that shows the total number of selected items. From here, you can also change the export order by dragging the Artworks the hand icon.
Artworks Data
Use the toggles to enable or disable specific fields (such as acquisition, rights, and restrictions, etc.). This allows you to choose which information from Artworks to include in the link. Additionally, with the toggle View on Wall You can enable "View on Wall" mode for the Artworks for which this feature has already been configured.
Price
Use the toggle switch to include all pricing information and, if necessary, customize the amount and currency for each work, without changing the original value in record archive record . Turn on the second toggle switch if you want to display the text "+ VAT". Use the toggle switch Export price notes to also include the information in the "Price Notes" field, if it has been filled out.

Images and videos
Use the toggles to choose whether you want to export the cover image and the secondary images and videos. If you prefer, you can customize your selection by clicking directly on the listed images and videos to include or exclude them.
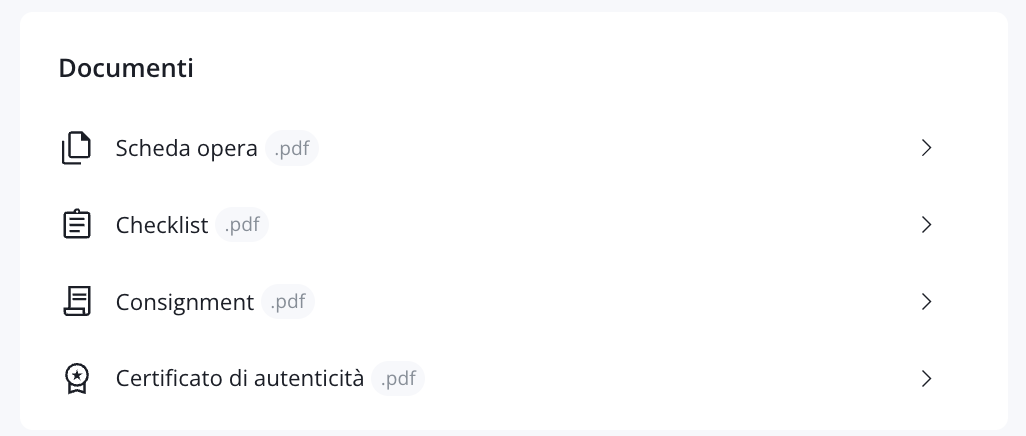
Folders and Files
Select which folders, attachments, and files you want to include in the link. Next to each file, you'll see an icon indicating the file type, such as Word, PDF, Excel, etc.
Share via Email
If you prefer to send the Artworks email, from the panel Manage click Export and then select the second option, Email.
Customize the information to include in your email:
General Settings
Choose the language the format you want to export the Artworks in Artworks which elements to include, such as: your logo at the top of the email and — if you've set up multiple locations in the Organization's Offices section — the headquarters text to be displayed at the bottom of the email.
Elements
From this section, you can edit your selection without having to go back to the Artworks section. Click on Manage selection to open the side panel on the right, where you'll find the complete list of Artworks your Artworks section Artworks can add or remove the ones you want to include. To view only the Artworks , Click on the green bar at the top that shows the total number of selected items. From here, you can also change the export order by dragging the Artworks the hand icon.
Artworks Data
Use the toggles to enable or disable specific fields (such as acquisition, rights, and restrictions, etc.). This allows you to choose which information from Artworks to include in the email. Additionally, with the toggle View on Wall You can enable "View on Wall" mode for the Artworks for which this feature has already been configured.
Price
Use the toggle switch to include all pricing information and, if necessary, customize the amount and currency for each work, without changing the original value in record archive record . Turn on the second toggle switch if you want to display the text "+ VAT". Use the toggle switch Export price notes to also include the information in the "Price Notes" field, if it has been filled out.
Images and videos
Use the toggles to choose whether you want to export the cover image and the secondary images and videos. If you prefer, you can customize your selection by clicking directly on the listed images and videos to include or exclude them.
Folders and Files
Select the folders, attachments, and files you want to include in the email. Next to each file, you'll see an icon indicating the file type, such as Word, PDF, Excel, etc.
Export Artworks
Documents
After selecting the Artworks, choose the document type.
Click on the titles below to expand them:
record
Generate a detailed document with images and information about Artworks . This is the most comprehensive format, useful for proposals to interested clients, curatorial insights, materials for publications, and so on.
General Settings
- Document name, language, and font: Enter the document title, select the language, and choose the font to be used for the text.
- Image quality: Select whether images should be in high, medium, or low resolution, depending on how the file will be used:
- Low: Recommended for internal use to keep the PDF file size small.
- Medium or high:ideal for materials intended for external sharing or printing, to ensure the highest quality and showcase the Artworks to its best advantage
- Page orientation: Choose between landscape or portrait, depending on your preference or the content.
- Additional elements: Decide which elements to include in the file, such as:
- The "View Online" button, which allows you to open, enlarge, and share the Artworks .
- The page number on each sheet of the document.
- The organization's logo, to be displayed at the bottom of every page.
- If you have set up multiple locations in the "Offices" section of your organization, select the specific one you want to display in the document.
Elements
From this section, you can edit your selection without having to go back to the Artworks section.
Click on Manage selection to open the side panel on the right, where you'll find the complete list of Artworks your Artworks section Artworks can add or remove the ones you want to include.
To view only the Artworks , Click on the green bar at the top that shows the total number of selected items. From here, you can also change the export order by dragging the Artworks the hand icon.
Artworks Data
Use the checkboxes to enable or disable specific fields (such as acquisition, rights, and restrictions, etc.). This allows you to choose which information from the Artworks to include in the record .
Price
Use the toggle switch to include all pricing information and, if necessary, customize the amount and currency for each work, without changing the original value in record archive record . Turn on the second toggle switch if you want to display the text "+ VAT". Use the toggle switch Export price notes to also include the information in the "Price Notes" field, if it has been filled out.
Images and videos
Use the toggles to choose whether you want to export the cover image and the secondary images and videos. If you prefer, you can customize your selection by clicking directly on the listed images and videos to include or exclude them.
Folders and Files
Select the folders, attachments, and files you want to include in the email. Next to each file, you'll see an icon indicating the file type, such as Word, PDF, Excel, etc.
Checklist
Export a PDF list of Artworks —useful for creating a list of Artworks display to print for the public, a list of Artworks the booth for your team, or even a checklist for logistics and transportation management.
General Settings
Choose the document name, language, and text font. Customize the page content, such as adding a QR code to view the Artworks , a sequential number next to each artwork, and whether to include your logo and Contacts footer (if you can’t find Contacts , set it up in the “Organization Offices” section).
Elements
From this section, you can edit your selection without having to go back to the Artworks section.
Click on Manage selection to open the side panel on the right, where you'll find the complete list of Artworks your Artworks section Artworks can add or remove the ones you want to include.
To view only the Artworks , Click on the green bar at the top that shows the total number of selected items. From here, you can also change the export order by dragging the Artworks the hand icon.
Artworks Data
Use the toggles to enable or disable specific fields (such as acquisition, rights, and restrictions, etc.). This allows you to choose which information from the Artworks to include in the checklist.
Price
Use the toggle switch to include all pricing information and, if necessary, customize the amount and currency for each work, without changing the original value in record archive record . Turn on the second toggle switch if you want to display the text "+ VAT". Use the toggle switch Export price notes to also include the information in the "Price Notes" field, if it has been filled out.
Images and videos
Use the toggles to choose whether you want to export the cover image and the secondary images and videos. If you prefer, you can customize your selection by clicking directly on the listed images and videos to include or exclude them.
The number of Artworks page may vary (on average 5–6) depending on the size of the images: if some images are taller and take up more vertical space, a page may contain fewer Artworks. In such cases, the group of 30 Artworks span multiple pages, and the next group may begin on the following page.
This behavior cannot currently be modified. Introducing fixed dimensions would ensure uniform distribution, but it could compromise the visual presentation of Artworks by forcing images of different sizes into uniform spaces.
Consignment
Create a three-party agreement document in which you can include the details and terms of sale for your Artworks. The consignment agreement can also be saved as a template so you don’t have to start from scratch when drafting a new one.
General Settings
Enter the document name and, if available, select a template. To learn more about creating Consignment template: Read the related article. Continue by selecting the items you want to include:
- Signature:Include a space for the sender's signature and one for the recipient's.
- Billing information:Include the billing information for both the sender and the recipient.
- Logo and Footer: Choose whether to include your logo and Contacts if you can't find the Contacts your location, set it up in the "Offices" section of the organization).
Elements
From this section, you can edit your selection without having to go back to the Artworks section.
Click on Manage selection to open the side panel on the right, where you'll find the complete list of Artworks your Artworks section Artworks can add or remove the ones you want to include.
To view only the Artworks , Click on the green bar at the top that shows the total number of selected items. From here, you can also change the export order by dragging the Artworks the hand icon.
Artworks Data
Use the checkboxes to enable or disable specific fields (such as acquisition, rights, and restrictions, etc.). This allows you to choose which information from Artworks you want to include in the consignment document.
Price
Use the toggle switch to include all pricing information and, if necessary, customize the amount and currency for each work, without changing the original value in record archive record . Turn on the second toggle switch if you want to display the text "+ VAT". Use the toggle switch Export price notes to also include the information in the "Price Notes" field, if it has been filled out.
After configuring the information you want to share, click Document preview at the bottom right. Continue by entering the sender and recipient information—if they are not listed in the drop-down menu, click + Create a new contact. Enter the date manually or select it from the calendar, and enter the location. If necessary, enter text where indicated by Enter your text here... Once you've filled in all the fields, you can choose to save the document as a template by clicking the button Save template , or export it by clicking the button Export.
Certificate of Authenticity
Quickly generate a certificate of authenticity for your artwork. This type of export is only available for one artwork at a time.
General Settings
Enter the document name and select the language. You can also choose whether to include a space for the artist’s signature (useful if you are the artist yourself or manage the archive of a living artist). By default, the document will always include a space for your organization’s signature (Click here to manage your organization’s name). Choose whether to display your logo and Contacts the footer, and select your location (if you have configured more than one in the Organization Offices section).
Artworks Data
Use the toggle switches to enable or disable specific fields (such as Dimensions and Weight, Edition, etc.). This allows you to choose which details of the selected artwork you want to include in the certificate of authenticity.
Price
Use the toggle switch to include all pricing information and, if necessary, customize the amount and currency for each work, without changing the original value in record archive record . Turn on the second toggle switch if you want to display the text "+ VAT". Use the toggle switch Export price notes to also include the information in the "Price Notes" field, if it has been filled out.
After configuring the information you want to share, click the button Preface at the bottom right. Continue by entering the date, location, and any text. Click Export Click below to generate the document.
Other formats
Excel file
Generate an Excel file consisting of a series of sheets. Within each sheet, you'll find details about documents, history, etc., based on the fields you filled out in the record .
General Settings
- Settings:Enter the document name and select the language.
- Excel sheets:Use the toggles to enable or disable specific fields (such as Placement History, Folders, etc.). This allows you to choose how many sheets you want your Excel file to contain.
Elements
From this section, you can edit your selection without having to go back to the Artworks section.
Click on Manage selection to open the side panel on the right, where you'll find the complete list of Artworks your Artworks section Artworks can add or remove the ones you want to include.
To view only the Artworks , Click on the green bar at the top that shows the total number of selected items. From here, you can also change the export order by dragging the Artworks the hand icon.
After configuring the information to be exported, click " Generate Excel " in the lower-right corner.
Tags
Export the Artworks as labels that can be used for shipping, as captions during an exhibition, or when displaying your Artworks a trade show.
General Settings
Enter the document name, language, and text font. Choose the label type (with or without an image, or with a QR code to view the artwork online) and the elements it should contain, such as adding a sequential number next to each artwork. Also choose whether to include your logo and Contacts each label (if you can’t find Contacts , configure it in the Organization Offices section).
ElementsFrom this section, you can edit your selection without having to go back to the Artworks section.
Click on Manage selection to open the side panel on the right, where you'll find the complete list of Artworks your Artworks section Artworks can add or remove the ones you want to include.
To view only the Artworks , Click on the green bar at the top that shows the total number of selected items. From here, you can also change the export order by dragging the Artworks the hand icon.
Artworks Data
Use the toggles to enable or disable specific fields (such as Technique, Edition, etc.). This allows you to choose which information from Artworks you want to include in the labels.
Price
Use the toggle switch to include all pricing information and, if necessary, customize the amount and currency for each work, without changing the original value in record archive record . Turn on the second toggle switch if you want to display the text "+ VAT". Use the toggle switch Export price notes to also include the information in the "Price Notes" field, if it has been filled out.
After configuring the information you want to share, click the button Export at the bottom right.
QR code
Export the Artworks as a private QR code, public QR code, or barcode.
General Settings
Enter the document name and language. Select the type of QR code (Public, Private, Barcode) and choose whether you want to include a "Request Info" button on the web page linked to by the QR code.
This address can be configured and edited in the Network Settings . To ensure compliance with user data regulations, make sure you have set up your privacy policy and terms and conditions in the Settings Panel.
From this section, you can edit your selection without having to go back to the Artworks section.
Click on Manage selection to open the side panel on the right, where you'll find the complete list of Artworks your Artworks section Artworks can add or remove the ones you want to include.
To view only the Artworks , Click on the green bar at the top that shows the total number of selected items. From here, you can also change the export order by dragging the Artworks the hand icon.
Artworks Data
Use the toggles to enable or disable specific fields (such as acquisition, rights, and restrictions, etc.). This allows you to choose which information from the Artworks you want to include on the web page linked to by the QR code
Price
Use the toggle switch to include all pricing information and, if necessary, customize the amount and currency for each work, without changing the original value in record archive record . Turn on the second toggle switch if you want to display the text "+ VAT". Use the toggle switch Export price notes to also include the information in the "Price Notes" field, if it has been filled out.
Images and videos
Use the toggles to choose whether you want to export the cover image and the secondary images and videos. If you prefer, you can customize your selection by clicking directly on the listed images and videos to include or exclude them.
Folders and Files
Select the folders, attachments, and files you want to include. Next to each file, you'll see an icon indicating the file type, such as Word, PDF, Excel, etc.
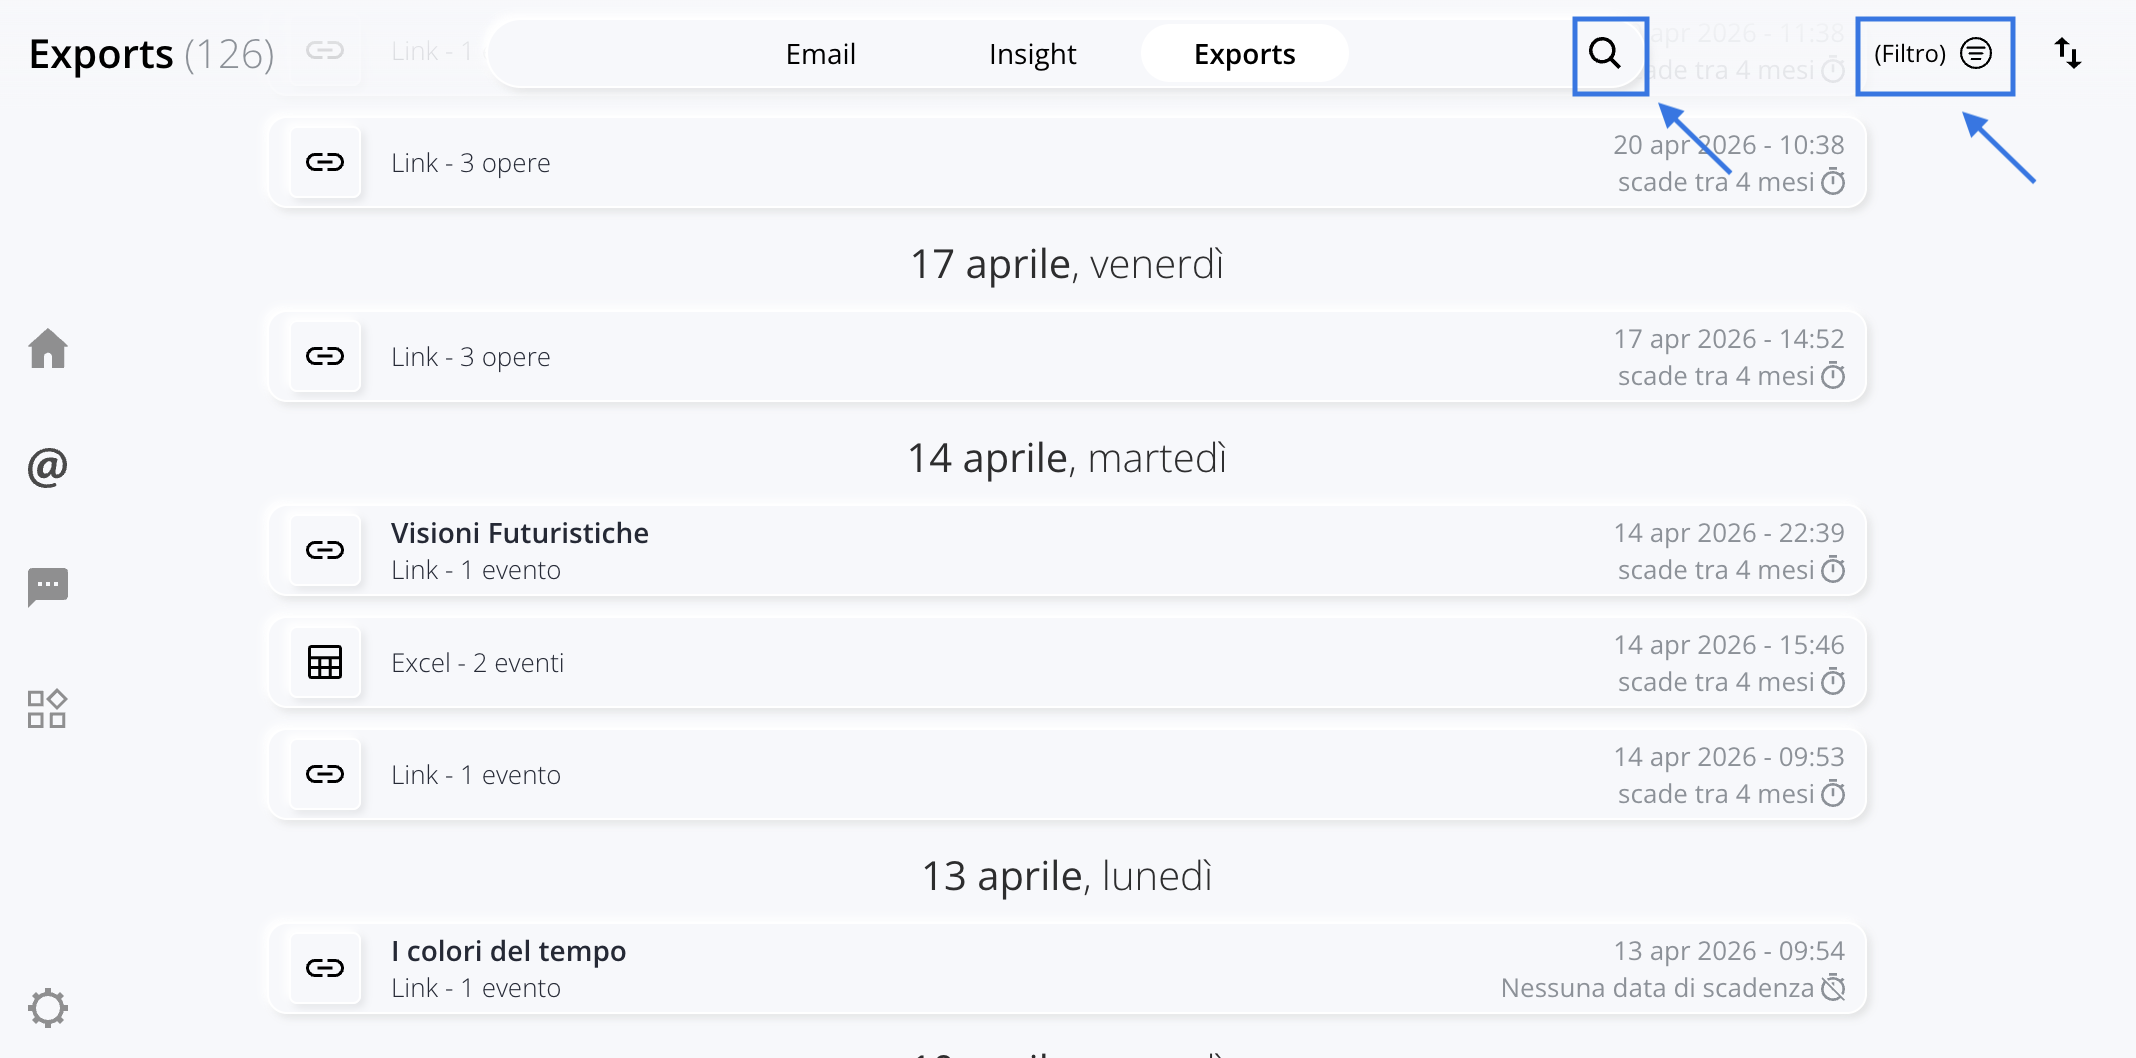
Where to find the generated exports
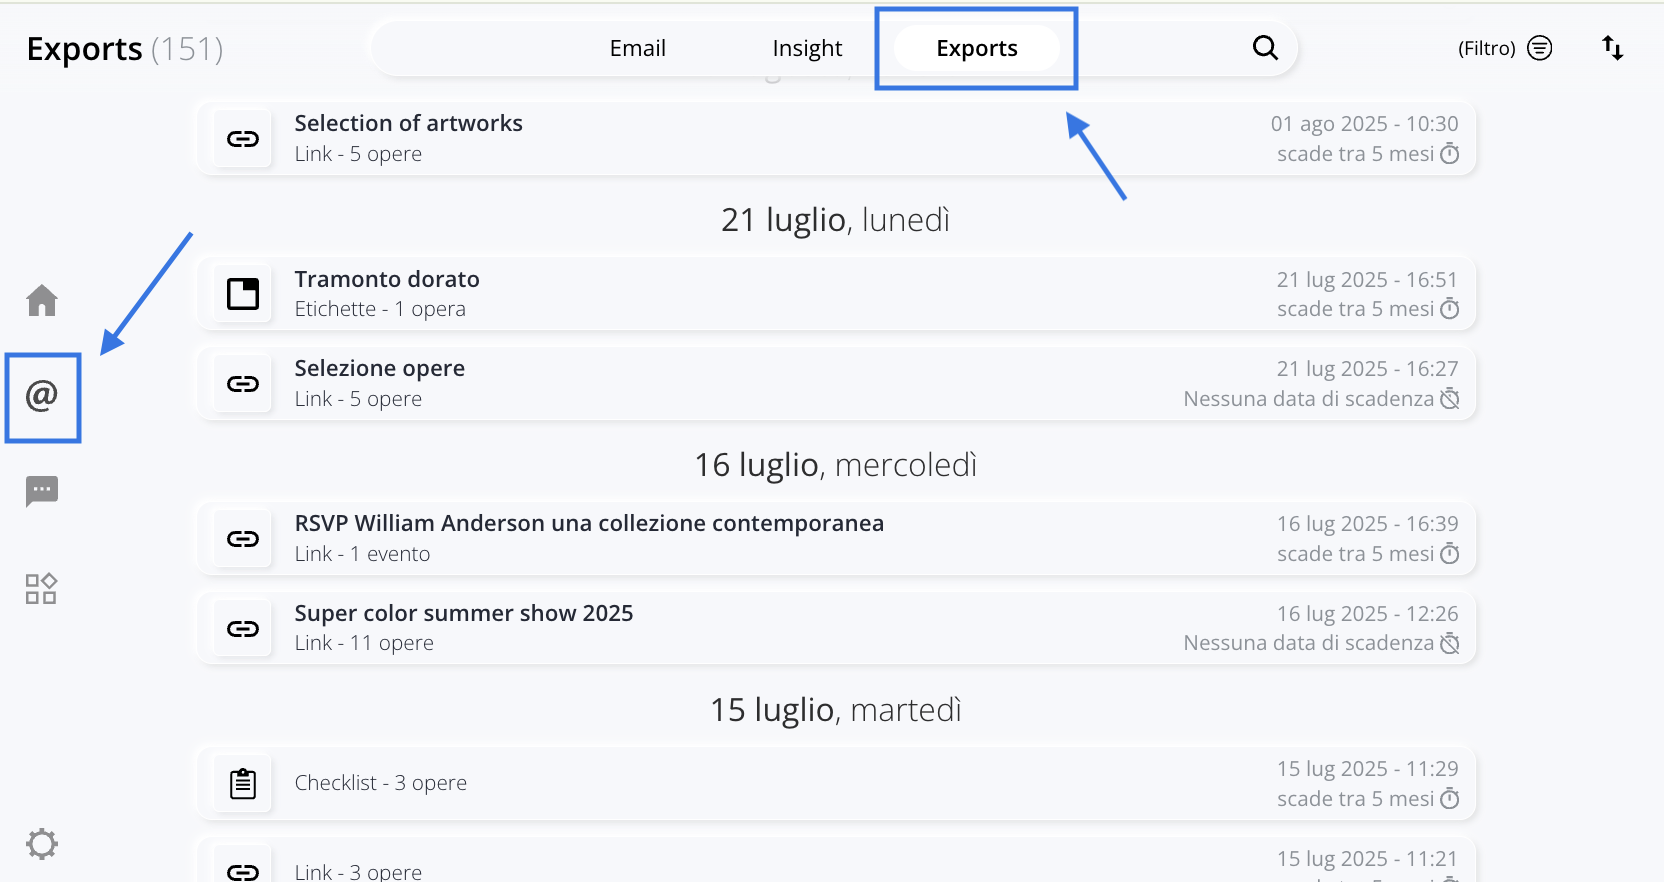
All generated exports can be found in the Export section, which you can access by clicking the @ icon in the left-hand side menu.
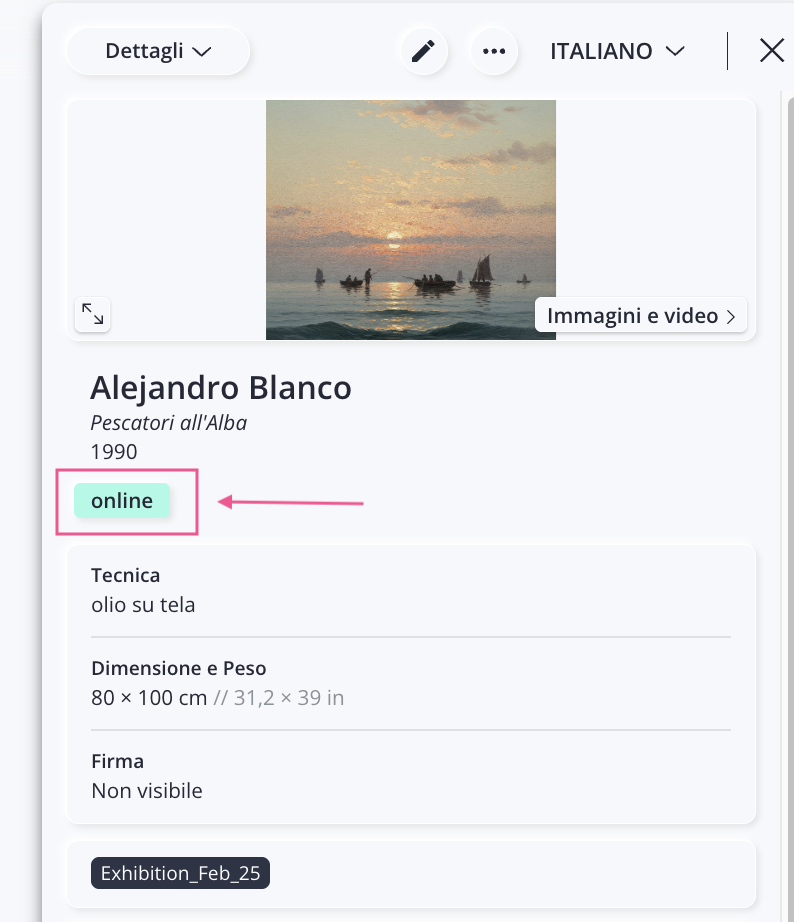
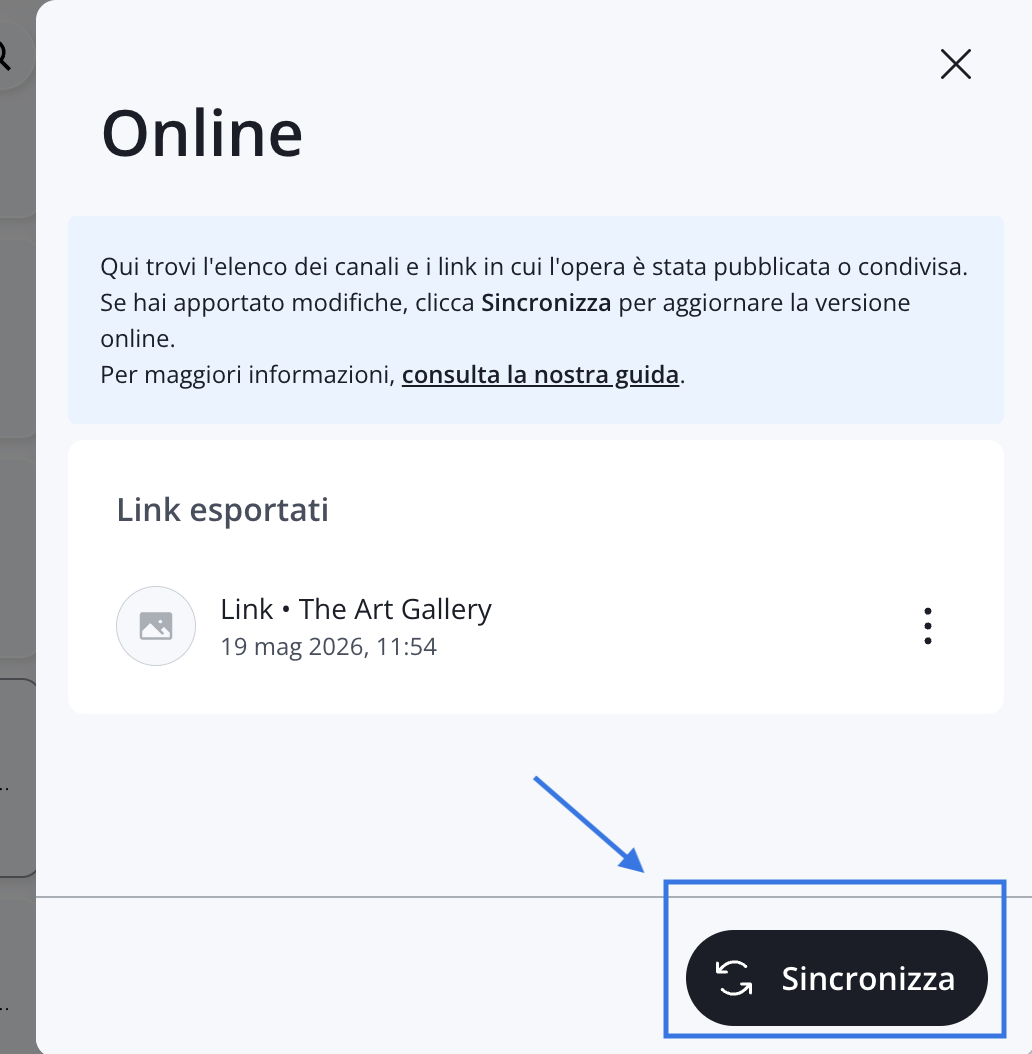
In addition to the Export section, links can also be viewed and managed directly from record by clicking the green button Onlinebutton. From this section, however, editing options are limited: you can only open the link in a new window, copy it, or delete it.
In the Export section, exports are sorted by creation date, starting with the most recent. Each export includes:
- The title of the export;
- The type: whether it is a link, an Excel record , a record , etc.;
- The number of elements (Artworks, events, Contacts, etc.) it contains;
- The date andtime of creation;
- How long until it expires?

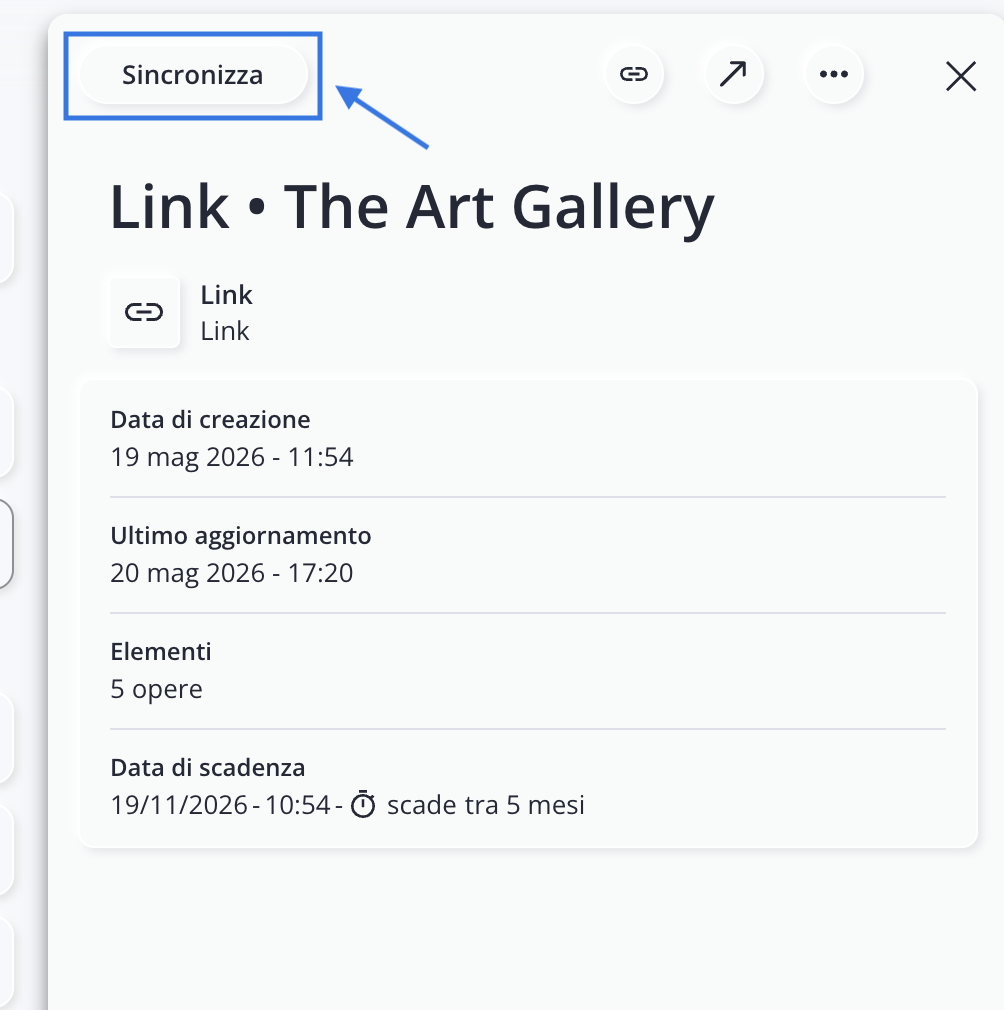
By clicking on an export, you can view additional details and perform various actions such as:
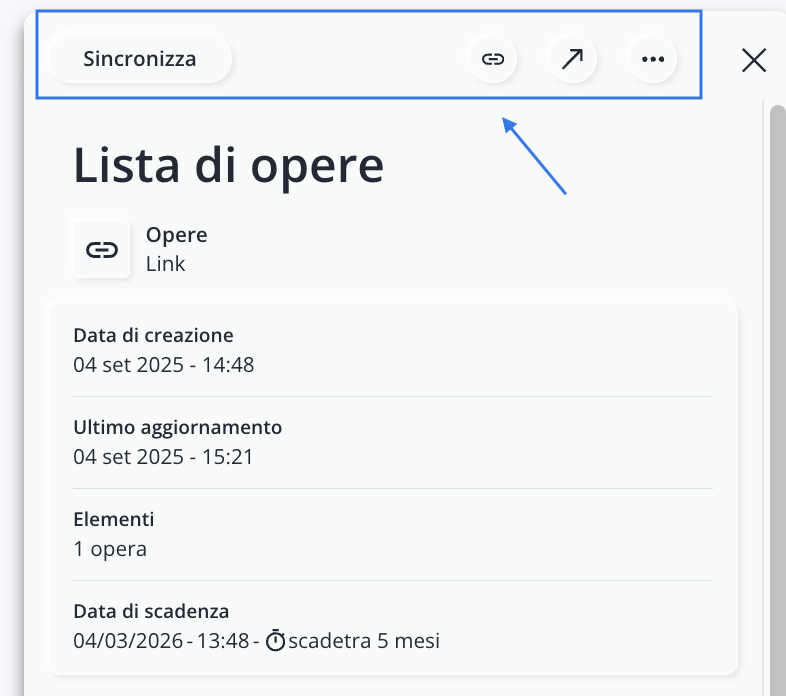
|
|
Synchronize the changes you've made. |
|
|
Copy the link. |
|
|
Open the link in a new window. |
|
|
|


Link Synchronization
After publishing a link, you may need to correct a typo, update some information, or modify data that’s already included in the shared version.
In these cases, you can use the Sync feature, which allows you to update the existing link without having to create a new one.
However, it is important to distinguish between:
- content already included in the link at the time it was created;
- content not included in the link's initial configuration.
The "Synchronize " feature updates only the content that was already shared in the original link. If you want to add new fields, new sections, or content that wasn't initially selected, go to the next section of this article,"Edit Configuration," to learn how to modify the link's configuration.
From the record
Use this mode if you need to correct or update information that is already included in the link for a single work.
For example, if you shared the price in the link and want to change it, open the record edit mode, update the Price field, and click Save.
Next, click the green "Online " button and select "Sync " to update the online version of the link.
From the Export section
Go to the Export section if you have edited multiple records and want to update the information already shared via the same link all at once.
In the search bar of the Export section, search for the link you're looking for, or use the filters to narrow down the results.
Once you've found the link, click Sync.
You cannot synchronize documents (PDFs or Excel files) because they are static content.
Edit settings
Use the " Edit Configuration " feature if you want to add content to the link that wasn't included when it was created, specifically content found in the " Details" tab, such as images, videos, folders, or files.
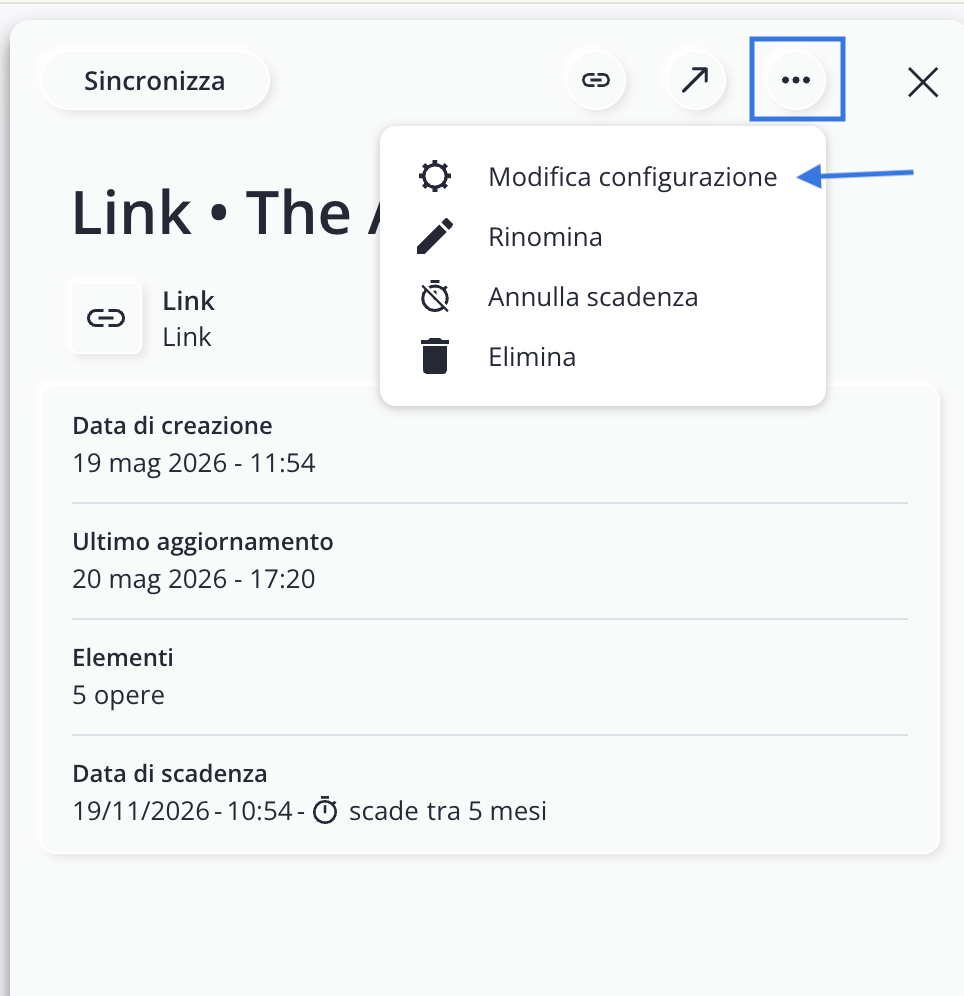
In fact, simple synchronization does not automatically add fields or sections that were not previously shared.
To change the settings, locate the link in the section Export, click the icon and select Edit settings. At this point, include the missing fields by selecting them manually or using the available toggles, then click Export at the bottom right.
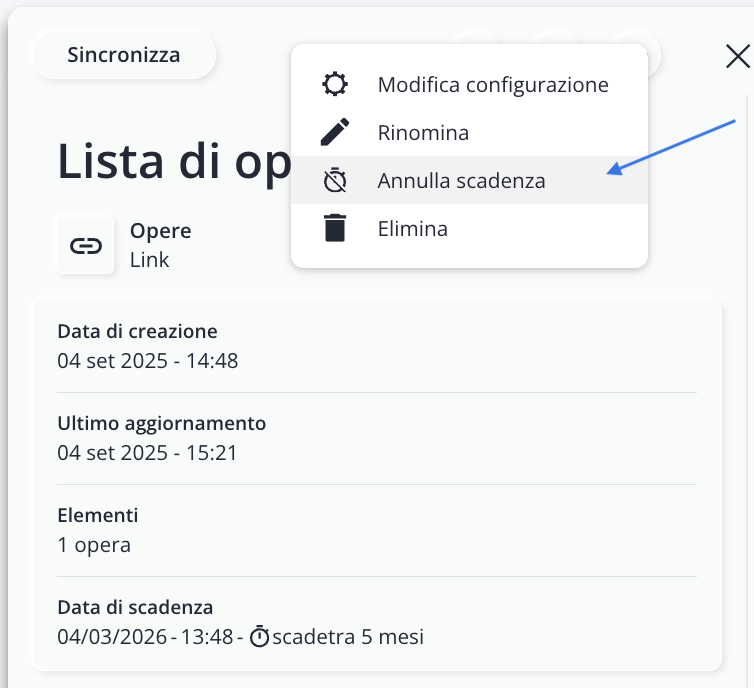
Clear the expiration date
By default, every type of export—whether it’s an Excel file, a link, or a document—has an expiration date of 5months. If you want your export to remain available for longer, be sure to remove the expiration date in the Export section. Once removed, the expiration date cannot be set again.