
Import artworks from an Excel file
Introduction
The Excel file import feature allows you to quickly add or update a large number of artworks in your Artshell archive.
This is the ideal solution if you already have a digital archive and want to avoid manually entering individual records . If, on the other hand, you’d prefer to have the Artshell team handle the import, you can request the Concierge Service or the Data Migration service (contact the Sales team to learn more).
In this guide, you will learn how to prepare the Excel file, import it correctly, and use it to update artworks already existing in the database.
Before you begin
To use the advanced import feature correctly, you must keep the following in mind:
- Use only the Excel template provided by Artshell;
- Make sure the template language matches the language of your Artshell account: if you use Artshell in Italian, use the Italian template; if you use Artshell in English, use the English template; if you use Artshell in French, use the French template;
- Do not modify or translate the headers in the first line of the file;
- Save the file in .xlsx format.
Important: Artshell uses column headers to correctly identify the fields to be imported. For this reason, always use the template in the same language as your account, and do not manually translate or modify the headers.
Step 1: Download the Excel template
You can download the Excel template in two ways:
- directly from this article, right here: DOWNLOAD THE EXCEL FILE;
- From the Settings panel → Import → Artworks → Download the Excel template. If you download the template directly from Artshell, make sure your account is set to the language you'll use for the import.
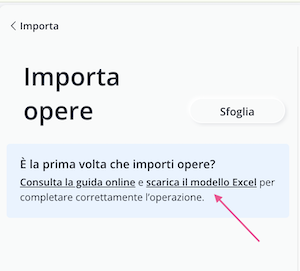
Open the file in Microsoft Excel or a compatible program (such as Google Sheets).
Step 2: Compile the file
The template consists of two opening lines.
| Riga | Contents |
|---|---|
| First line | Contains the column headers. Do not modify this. |
| Second line | It contains code examples that you can use as a reference. You can delete it before importing. |
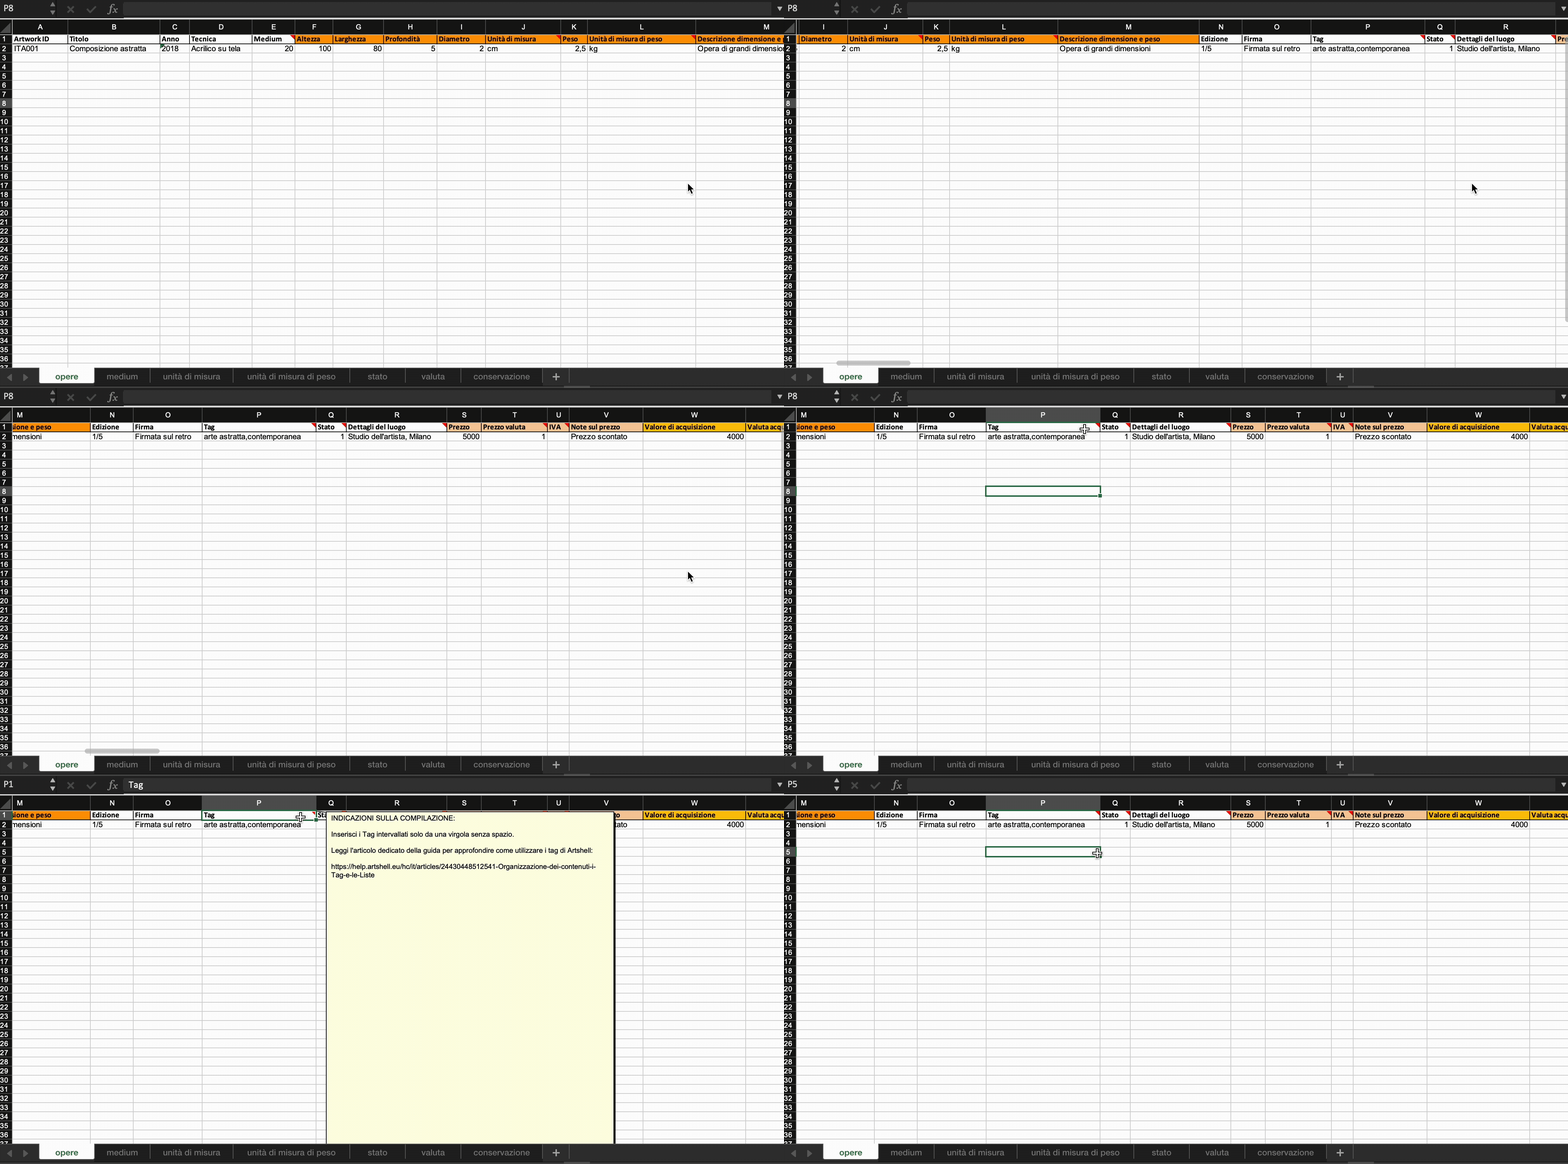
Each subsequent row represents an artwork record. Fill out one row for each artwork you wish to import.
Take a moment to review the columns in the file. If a piece of information is not available or not relevant, you can leave the corresponding cell blank.
For a detailed description of all available fields, you can also consult the Add an artwork article.
Read the instructions for filling out the form in more detail
| Artwork ID | text and number |
| Title | text and number |
| Year | number |
| Technique | text |
| Medium | text, from medium-weight paper |
| Height | number |
| Width | number |
| Depth | number |
| Diameter | number |
| Units of measurement | text, from a worksheet on units of measurement |
| Weight | number |
| Units of weight | text, from a sheet of paper; unit of weight |
| Dimensions and Weight | text and number |
| Edition | text and number |
| Signature | text and number |
| Tags | text |
| Status | text, from a government document |
| Location details | text and number |
| Price | number |
| Currency price | number, from currency sheet |
| VAT | "Yes" or an empty cell means "No" |
| Notes on the price | text and number |
| Acquisition cost | number |
| Acquisition currency | number, from currency sheet |
| VAT Collection | "Yes" or an empty cell means "No" |
| Type of taxation | text and number |
| Acquisition Date | number |
| Month of acquisition | number |
| Year of acquisition | number |
| Acquisition Notes | text and number |
| Insurance value | number |
| Insurance premium | number, from currency sheet |
| Insured | "Yes" or an empty cell means "No" |
| Insurance start date | number |
| Insurance expiration date | number |
| Policy number | text and number |
| Insurance Notes | text and number |
| Evaluation | number |
| Rate this review | number, from currency sheet |
| Valuation Date | number |
| Evaluation Month | number |
| Assessment year | number |
| Grading notes | text and number |
| Collection | text and number |
| Certified | "Yes" or an empty cell means "No" |
| Certificate issued by | text and number |
| Rights and Restrictions | "Yes" or an empty cell means "No" |
| Description of Rights and Restrictions | text and number |
| Resale right | "Yes" or an empty cell means "No" |
| Description of the resale right | text and number |
| Listed by the Department of Cultural Heritage | "Yes" or an empty cell means "No" |
| Description of the Superintendency's restrictions | text and number |
| SIAE | "Yes" or an empty cell means "No" |
| SIAE Description | text and number |
| Copyright | "Yes" or an empty cell means "No" |
| Copyright Notice | text and number |
| Photo credit | "Yes" or an empty cell means "No" |
| Photographer's copyright notice | text and number |
| Framed | "Yes" or an empty cell means "No" |
| Frame height | number |
| Frame width | number |
| Frame depth | number |
| Frame diameter | number |
| Frame dimensions | text, from a worksheet on units of measurement |
| Frame weight | number |
| Unit of measurement for frame weight | text, from a sheet of paper; unit of weight |
| Frame description | text and number |
| Condition | text, from the conservation sheet |
| Package height | number |
| Package width | number |
| Packaging depth | number |
| Packaging unit of measure | text, from a worksheet on units of measurement |
| Packaging weight | number |
| Unit of measurement for package weight | text, from a sheet of paper; unit of weight |
| Logistics company | text and number |
| Packaging description | text and number |
| Quantity | number |
| Notes | text and number |
Before importing
Before uploading the file, make sure that:
- the model's language matches the language of your Artshell account;
- the column headers have not been changed;
- the file is saved in .xlsx format;
- there are no filters;
- there is no formatting (bold, italics, colors, links, etc.).
Step 3: Import the file
Once the file is ready—and does not contain any filters or formatted elements—it's time to upload it to Artshell. Follow these steps:
- Click the icon in the lower-left corner to open the settings.
- Select the " Import" option.
- Select Artworks.
- Click the " Browse " button and select the file you want to import from your computer.
- Click the Import button and wait for the upload to complete.
The duration of the import depends on the number of artworks in the file and your internet connection speed.
By accepting Artshell'sterms and conditions, you have declared that you have the appropriate authorization to manage all the information from Artworks that you are uploading.
Once the import is complete
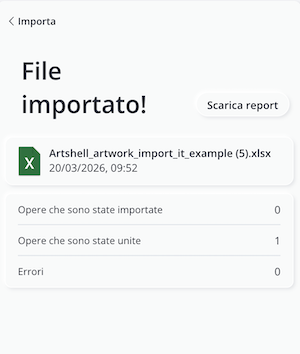
Once the upload is complete, Artshell displays a summary showing:
- How many artworks have been imported: the number of successfully imported artworks.
- How many artworks have been merged: the number of artworks already existing within Artshell that have been updated.
- Errors: the number of artworks that were not imported due to errors in filling out the file.
If Artworks or errors are detected during the import, a "Download Report" button will appear, allowing you to download an Excel file summarizing the Artworks and any errors.
Update existing artworks
Advanced import isn't just for adding new Artworks —you can also use it to update multiple records that are already in Artshell.
During subsequent imports, Artshell automatically checks whether each line in the file corresponds to an existing record , preventing the creation of duplicates.
How Artshell identifies an artwork
Artworks identified using the Artwork ID field.
| Situation | What Artshell does |
|---|---|
| The Artwork ID corresponds to an existing artwork | Update the record with the data from the Excel file. |
| The Artwork ID does not correspond to any artwork | Create a new artwork record. |
| The Artwork ID field is empty | It cannot verify whether the work exists and creates a new record, which risks generating duplicates. |
How the data is updated
When a work is identified as already existing, Artshell updates the record the following rules:
- Empty fields: these are populated with the values from the Excel file;
- Pre-filled fields: these are overwritten with the new values from the Excel file;
- Tags: Only tags that are not already present in the record are added.
This feature allows you to use the import function as a tool for bulk updates, ensuring that your database data remains consistently up to date.
Tip
If you need to update a large number of artworks , you can speed up the process by following these steps:
- Select the artworks you want to update or edit;
- First export the artworks from Artshell in Excel format;
- Copy the entire Artwork ID column from the exported file;
- Paste it into the import file;
- Fill in only the fields you want to update;
- Perform a new import.
This way, Artshell will be able to correctly recognize artworks and update them without creating duplicates.
Conclusions
Importing via an Excel file is the fastest way to add or update large numbers of artworks.
By filling out the file correctly and using the Artwork ID, you can keep your archive up to date while minimizing errors and duplicates.