Export event calendar
Introduction
Exporting as an event calendar is a convenient feature that lets you create a PDF with a professional, organized layout of a list of events and activities.
Within each sharing option , you'll find toggles— buttons that you can turn on or off to include or exclude specific features and associated details.
Watch the short explanatory video below:

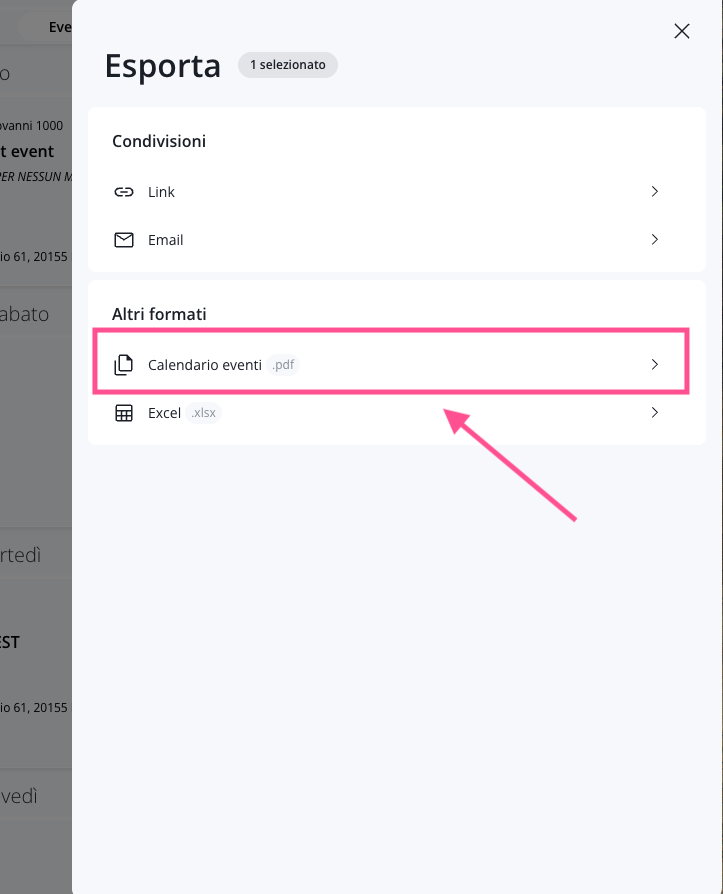
Select the events toexport
Exporting begins with selecting the events.
Once you've selected the events, the panel will automatically appear on the right Manage, which contains the sharing and export options. If the panel does not appear (for example, due to a small screen size), click the icon top right:

Select " Event Calendar " to open the corresponding screen. On this screen, you'll find the navigation menu on the left, where you can customize the content to suit your preferences.
Step 1: General Settings
In this section, you can configure the main settings for the event calendar you are about to create. As you fill in the fields, you’ll seethe documentpreview update on the right.
If the preview isn't visible right now, don't worry: it will appear after you select the date range, which we'll cover in a moment. To get started, enter the document name ( i.e., the file name once it's downloaded) and select the export language.
Export order
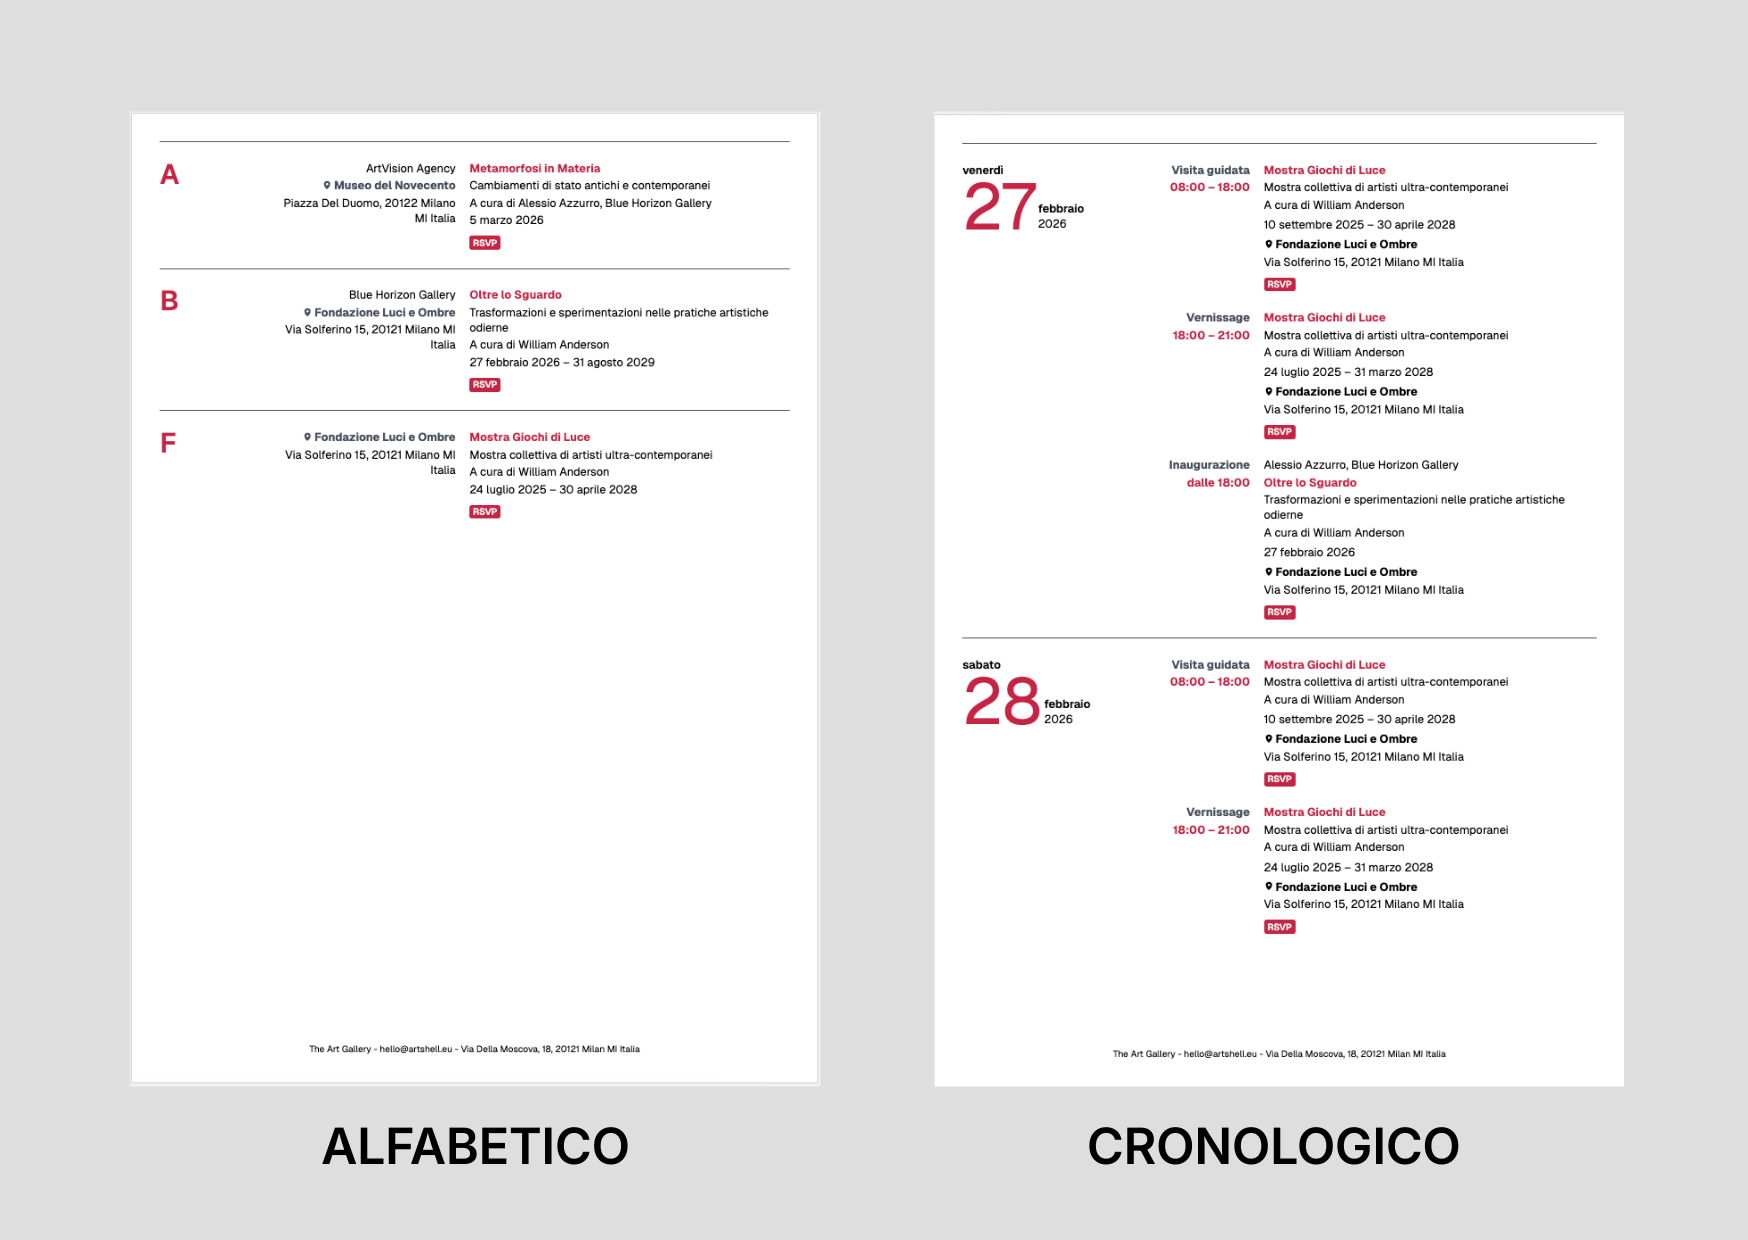
Choose how to order the events in the document. The order can be:
- Chronological – events are sorted by date. Within each date, events are sorted by start time.
- Alphabetical – events are listed by event organizer or, if no organizer is specified, by event location (Location field).
Below are two examples:
Some examples to consider:
- Different organizer and location:The calendar will display theorganizer’snameandtheaddress name. In this case, items are sorted alphabetically by the organizer’s name.
- Organizer field left blank:If the organizer is not listed in records selected events, the alphabetical sort uses the information in theName and Address field, following this order of priority:
- Name and address of the location, if available;
- Company Name;
- Contact's First and Last Name, Location.
- Insufficient data for alphabetical sorting:if the "Organizer" field is left blank and there is no "Name andAddress," "Company," or "First and Last Name" for the contact at the "Location," the event will not appear in the alphabetical list but will still be included in the chronological list.
- Organizer and Location are the same:the Organizer is listed asFirst Name Last Name, Company, andtheLocation is listed asAddress.If theAddress fieldisempty, theCompanyfield will be displayed; ifthat is also empty, theFirst Name and Last Name will be displayed.
- Multiple events by the same organizer: Ifthere are multiple events organized by the same organizer, they will be sorted alphabetically byvenue name under that organizer.
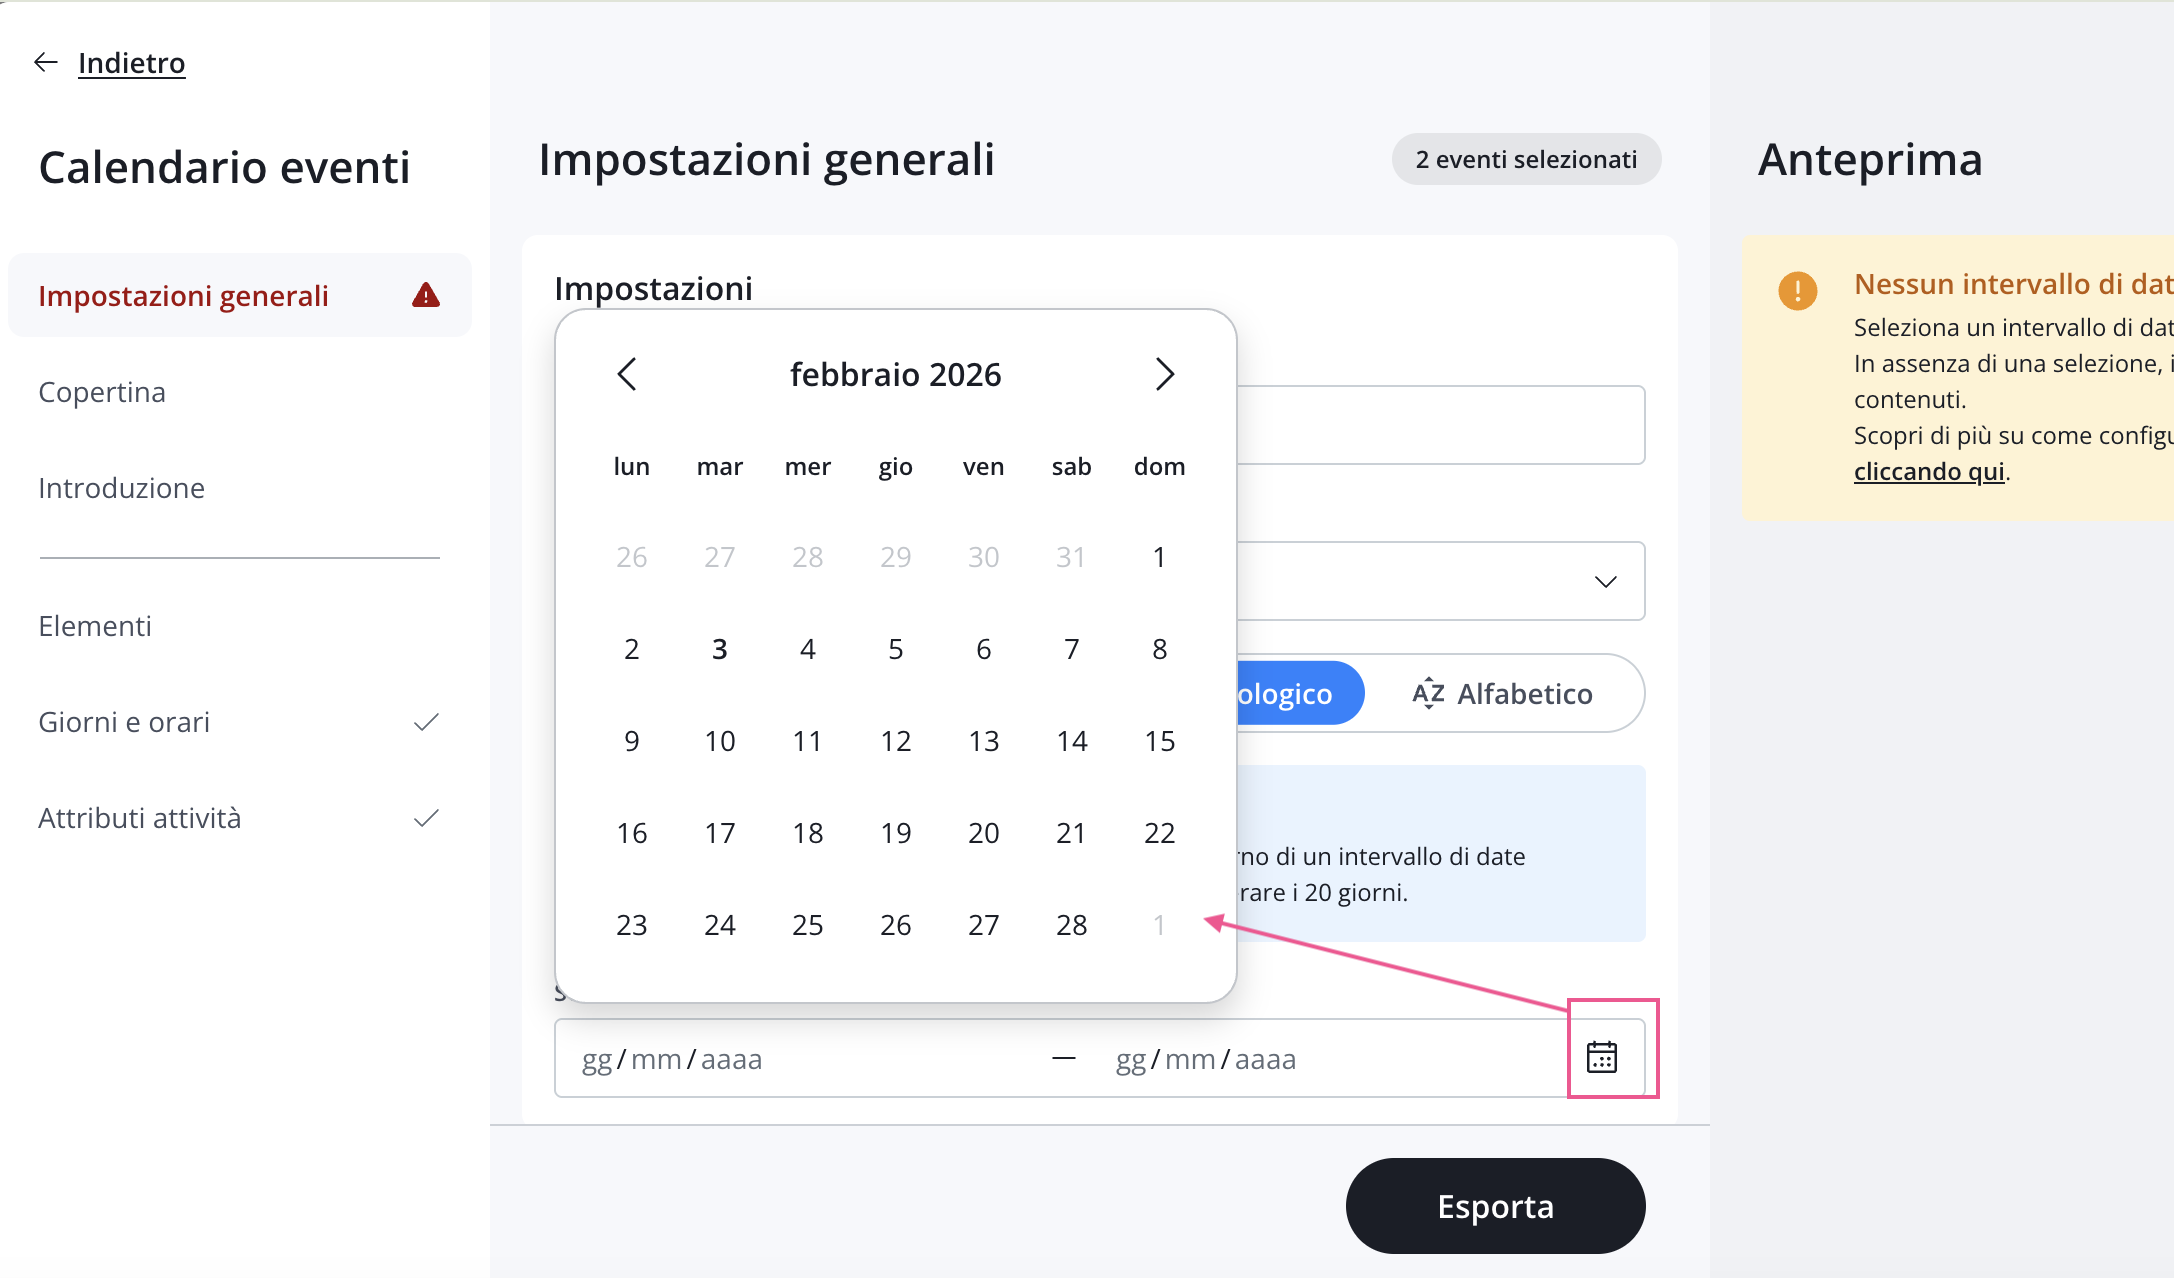
Select date range (only when sorted chronologically)
Select the time period you want to include in the event calendar.
You can select a maximum period of 20 consecutive days. To enter the dates for the range, type the numbers directly on the keyboard or click the icon The preview will start to appear on the right.
If the calendar includes many activities, you can scroll down through the preview to see how all the content will appear in the final document. This allows you to identify any text that is too long or information that needs to be corrected directly within the records .
If you notice any content that needs to be revised, we still recommend that you complete the setup and export the calendar: you can edit the document even after it has been generated via the Export section. The procedure is described later in this article. This way, you’ll avoid having to re-enter all the graphic and text settings you’ve already defined.
Page background and text style
In this section, you can customize the document's appearance by selecting:
- the background color;
- the font and text color.
We recommend that you always check the preview to ensure there is good contrast between the background and the text, so that all content is clearly legible.
Advanced settings
Here you can set some additional PDF options, including:
- whether or not to include bleed (i.e., the extra margins required for professional printing);
- page numbering;
- the footer that appears on every page of the document.
Step 2. Cover and Introduction
The cover andintroduction are elements that enhance your event calendar, giving it a more professional look and feel in terms of both content and design.
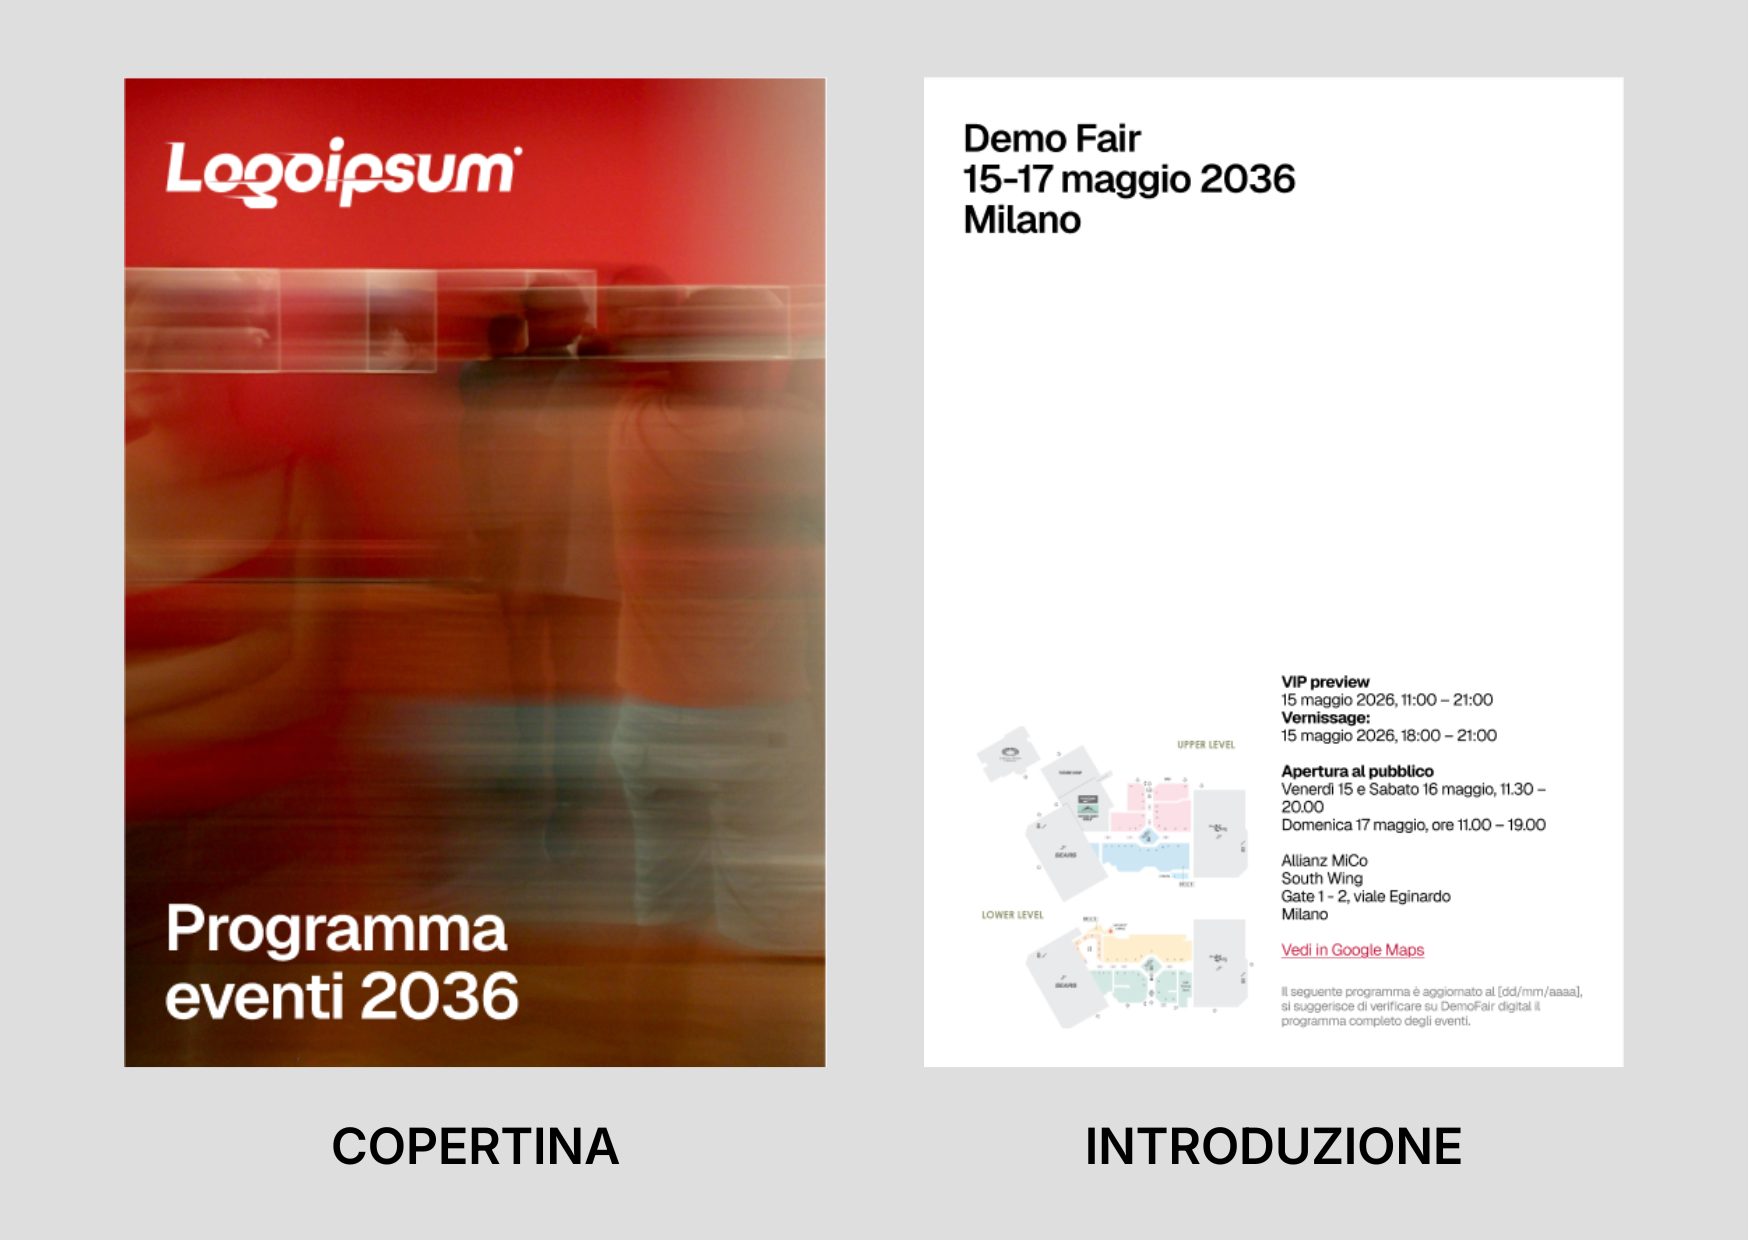
Cover
The cover is the first page of the events calendar and consists of three elements:
- Background: This can be a solid color (different from the color of the inner pages) or an image. If the image’s aspect ratio is not compatible with a portrait-oriented A4 sheet, it will be automatically resized and may appear partially cropped. Be sure to upload an image with sufficient resolution, as indicated in the software, especially if you plan to print the PDF.
- Logo: The logo for your account—which you previously uploaded in the Account Details section of Settings—is automatically displayed in the top-left corner . If you wish, you can upload a different logo, provided it is high-resolution and in PNG format with a transparent background. This alternative logo will not override the one saved in your account settings. You cannot change the size of the logo; if you feel your logo appears too large, you can upload it as an alternative logo with a wider transparent border.
- Title: You can enter a title of up to 80 characters (including spaces) and choose the text color. The title font is the same as the one selected in Step 1 of the General Settings; you cannot choose a different font for the cover.
Introduction
The Introduction appears on the second page of the event calendar and consists of three text fields and an image. The font and colors for this section are defined in the document’s General Settings.
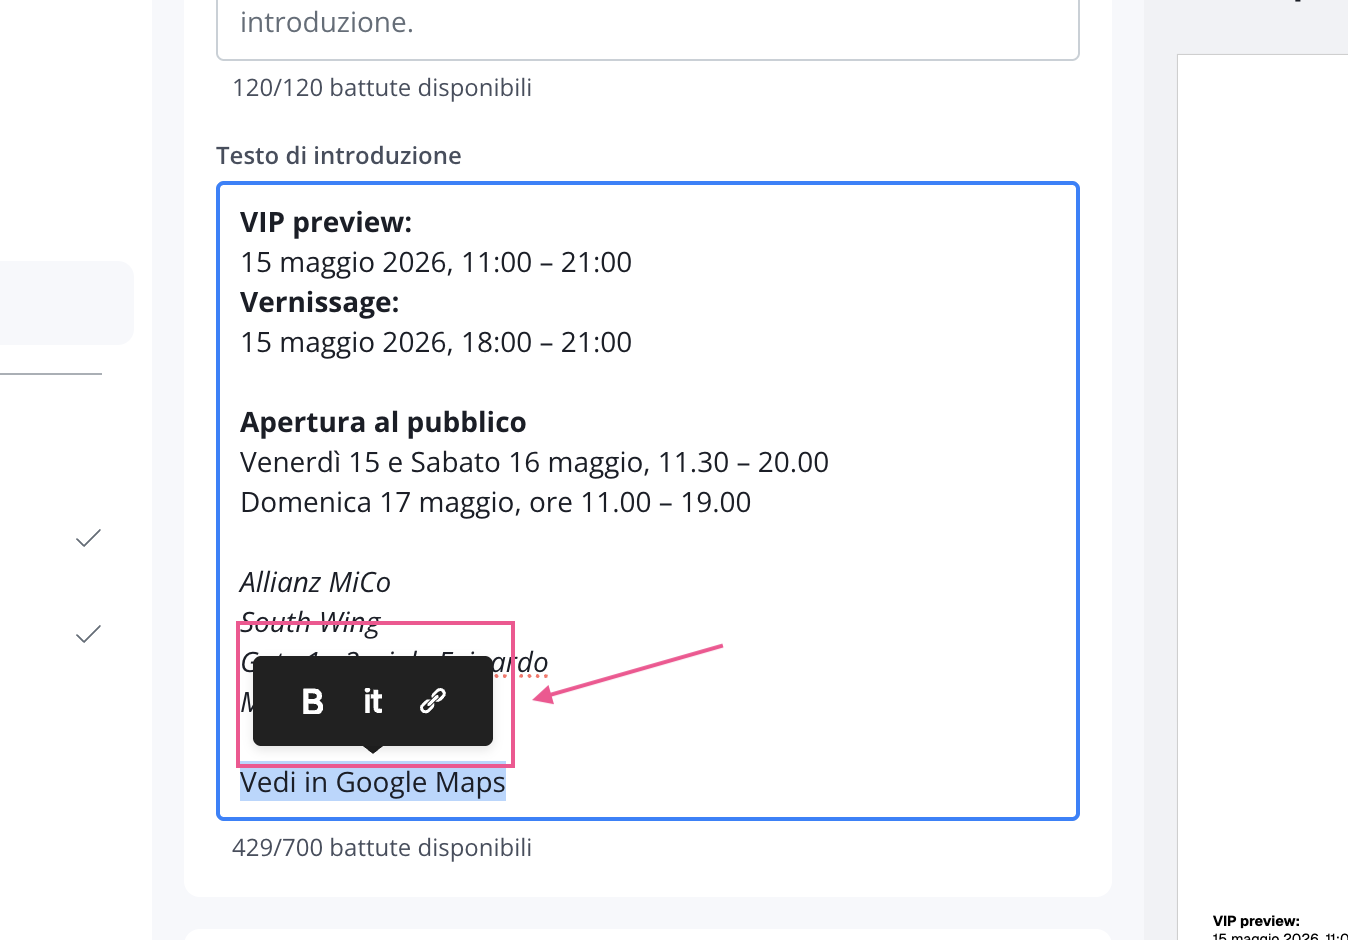
In the Page Title field, you can start a new line by pressing the Enter key on your keyboard. In the Introduction Text field, in addition to managing line breaks, you can highlight one or more words to display the editing menu and apply bold, italics, or insert a link.
In the last field, the " Information Note," you can also press the Enter key on your keyboard to start a new line. This field is useful for adding service-related content, such as indicating when the event calendar was created or updated—so users know the date of the last update—or for including helpful announcements or warnings regarding the calendar’s content.
Here are a few examples of cover pages or introduction pages you can create with Artshell.
If you do not want to include either the cover page or the introduction, simply leave all fields in both sections blank and proceed with generating the PDF anyway.
The document will be created with the cover page and introduction as the first two pages, but these pages will be blank. You can easily remove them by opening the PDF in Preview (on iOS/macOS devices) or in Adobe Acrobat.
Step 3. Elements
Here is a list of the events currently selected for export. Please check to make sure all the events you want to include are listed.
To add more events, click on "Manage Selection": this will open the side panel where you can select new events. If you've selected too many events, you can remove them one by one or click theX to clear your selection and choose only the correct events again.
Be careful not to select events outside the date range you previously set.
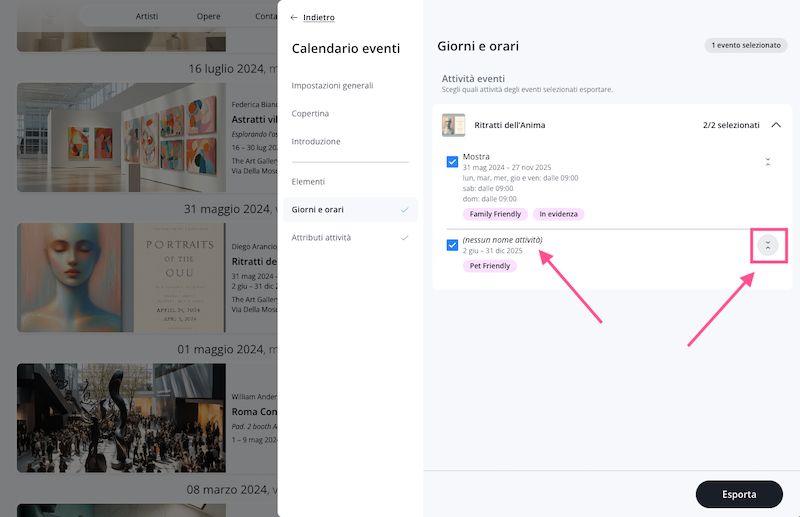
Step 4. Days and times
In this section, choose which activities from each event you want to include in the export. To help you select the activities that make up your event, this section includes an arrow icon on the right that you can click to expand and view:
- Special operating hours, if applicable
- The activity attributes, if they have been entered
(No activity name)This message appears if you have not entered any content in the"Activity Type" field within the record .
Step 5. RSVP and Activity Attributes
This section shows you some additional labels that you can include in your PDF.
RSVP for the Exhibition
The "Show RSVP " option is directly linked to the "Booking Options" field: if this field is enabled (even with restrictions), the "RSVP" label will automatically appear on all events that require a reservation.
Activity attributes
Activity attributes are additional labels that you can associate with event activities to provide users with quick and easy-to-read information. In this section, you’ll find a list of all attributes present in the activities of the selected events. You can use the checkboxes to decide which ones to include or exclude in the Event Calendar export. It’s important to note that this selection affects only the export (and the preview you see in the General Settings section) and does not change how the attributes are displayed in the Days and Times section, where they remain visible for informational purposes. Once selected, the attributes will be displayed as labels in all events associated with them within the export.
Step 6. Export
If the preview meets your expectations, you can proceed with the export by clicking the Export button at the bottom.
Change to the event calendar
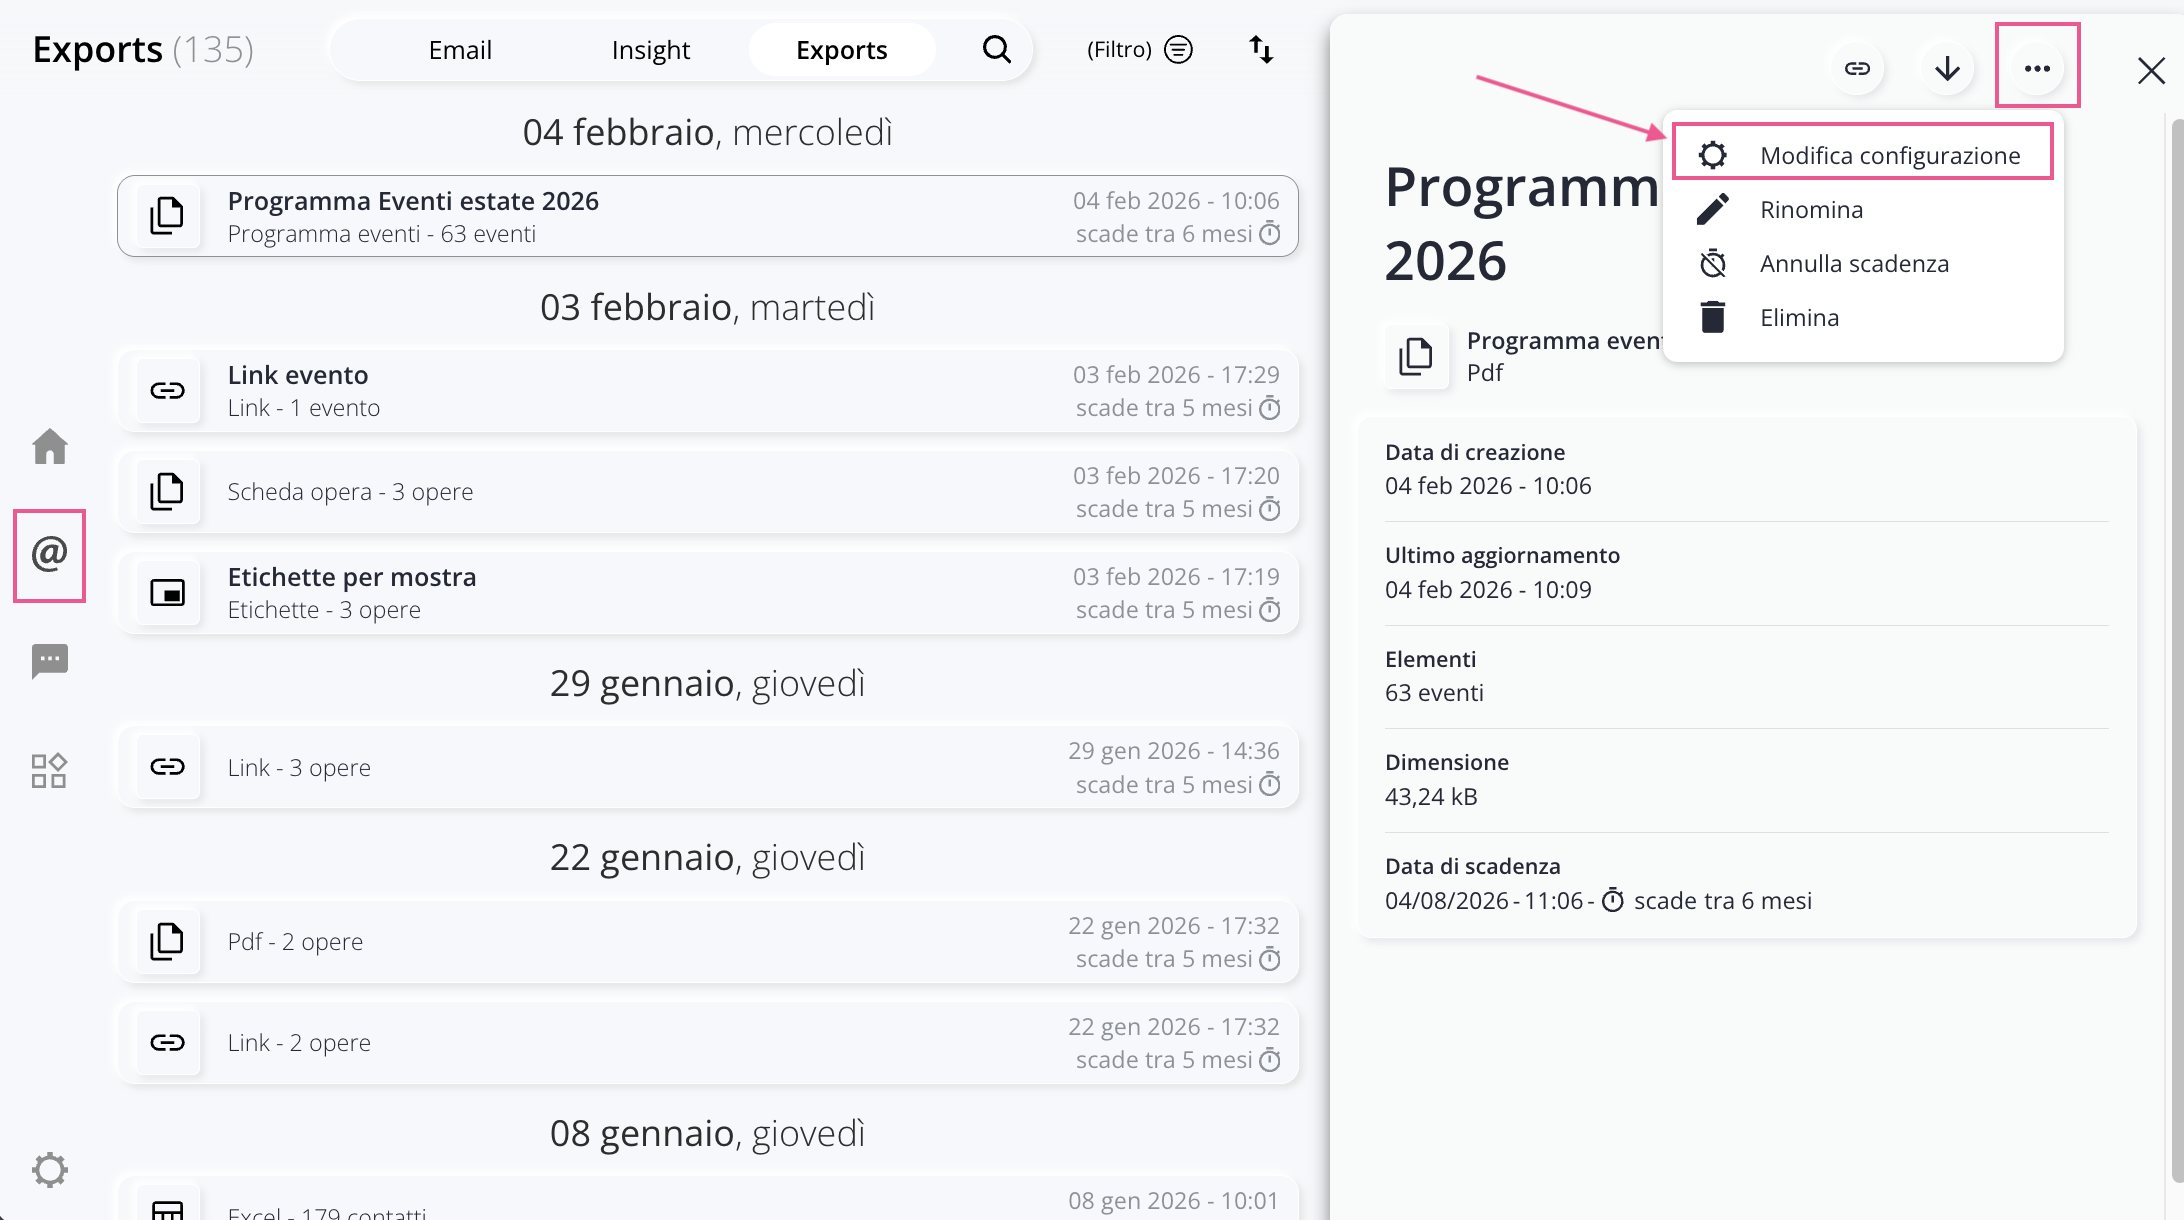
If you realize you've made mistakes while creating the event calendar, you can always make changes in the Export section without having to start over and create a new PDF.
Click " Edit Configuration " to return to the event calendar editing panel.
Conclusion
Once the export is complete, your event calendar will be available in the Export section, where you can download, rename, or edit it at any time.
This allows you to correct any inaccuracies, update the content, or adjust the layout without having to repeat the entire setup process.
Thanks to the flexibility of the available options, exporting as an event calendar allows you to create professional, customized documents that are ready to share or print, showcasing your schedule to its best advantage.