The Details tab in events
Introduction
The " Details" tab of record allows you to collect, organize, and manage all additional content related to an event.
From this section, you can link Artworks, images, videos, folders, attachments, and files, as well as check where the event has been published or shared online and view any reservations received.
The "Details" tab is therefore useful for centralizing event materials and getting a more comprehensive view of all content associated with the record.
Prerequisites
This article explores advanced features of the Events section. Before proceeding, we recommend that you also review the articles on:
- Medialibrary Library
- Introduction to the Events section
- Folders and Attachments: structure, use, and management
- The Public function for events
Go to the Details tab
To access the Details tab, select an event from the Events section and click Details in the upper-left corner of the record.
The Details tab contains several sections:

Artworks
In the section Artworks section, you can associate one or more Artworks your Artshell account with the event.
To add Artworks :
- Open the Details tab and select Artworks.
- Click the icon and select the Artworks want to add. You can also use the search bar and the available search operators, for example tag or artist.
- Click the green bar with the selected items counter to view only the Artworks and, if desired, reorder them by dragging them.
- Use the selection icon to select all the Artworks or the icon X to clear the selection.
- Click the Add button to confirm.

Once added, Artworks be sorted, selected, removed from record , or searched for using the internal search bar.
If the event is published online, the Artworks may also be displayed on the event’s published page, depending on the selected publication settings.
Images and Videos
In the " Images and Videos " section, you'll find all the multimedia content related to the event.
You can use this section to upload images of the event setup, promotional materials, posters, teaser videos, or other visual content related to the event.
In this section, you can:
- Search for content using the search bar.
- Add images or videos from Medialibrary by clicking the icon .
- Select multiple media items using the selection icon
- Manage individual media files or multiple selections.

Managing a single media file
By clicking on an image or video, you can open the content and view its details, such as the file name, the video link ( if the media is a video), the description, any notes, and the language set at the time of upload.
The "Description " and "Notes" fields in this section are different from those in Medialibrary, so the content does not overwrite each other.

The description entered here appears alongside the image when it is shared and can be used, for example, to provide photo credits. The "Notes" and "Type" fields, on the other hand, are always private: they are visible only within your account and are never included in shared posts.
By clicking the icon You can open the options menu in the upper-right corner of the media.

At the top of the record also find the lock functionand the multilingual , and the X icon to return to the full media view.
The management menu is also available in grid view, again via the icon .

Managing a selection of media
To manage multiple images or videos at once, click the selection icon and select the media you want to edit. Once you've selected them, click the icon to open the options menu. The selected action will be applied to all selected items.

Note: Removing an image or video from the Images and Videos section does not delete it from the Medialibrary.
Folders
The "Folders" section expands on the information in the record , allowing you to upload and link additional data.
You can use folders to collect, for example, presentations or official materials to share with the press or partners, descriptions of Artworks, logistics and transportation information (loading/unloading times, contact details), etc.
Below is an example of the fields within an record .

If this is your first time using folders, we recommend that you first read the article titled " Folders and Attachments: Structure, Use, and Management."
For your convenience, here is a summary of the main features and instructions on how to create a folder and add your first attachment from record .
To create a new folder:
- Select the record .
- Click the Details tab and select Folders.
- Click the ➕ and enter a new name in the search bar, then click Create. Enter the name of the new folder in other languages as well if you plan to share the content with an international audience.
-
Click Create to finish creating the folder.


To add attachments:
- Open the folder and click the ➕.
- Enter a title, text, or multimedia elements (images, videos, or files) or graphics (separators or sliders), the date, and translate the content using the multilingual feature if needed.
- Click Save to update the contents of the folder.

Returning to the list of folders, you can view some useful information:
- The number next to each title indicates the number of attachments in the folder.
- The date on the right indicates when the folder was added to the record.
- The icon allows you to move attachments to another folder or delete the folder itself.
Warning! You cannot delete a folder that contains attachments. To delete the folder, first move all the attachments to another folder.
Managing attachments
Within folders, attachments can be: locked using the lock feature, moved to other folders, or deleted.

File
In the " Files " section, you'll find all the files associated with your event.
You can use this section to upload press releases,contracts with suppliers, artists, or partners, floor plans of the exhibition space or venue, catalogs and brochures, and Word or Excel files. Within the Files section, you can:
- Search for a file using the search bar.
- Click the ➕ icon to add new files. You can upload any type of file (e.g., .zip, .mp4, .docx, etc.) without any format or size restrictions.
If the file you want isn't already in the Medialibrary, click the ➕ icon again to upload it directly from your computer.

Before you begin uploading files, the system will display a record each file, where you can add a description and notes in three languages (Italian, English, and French). The file name, however, remains the same in all three languages.

You can further manage your files using the icon , specifically, you can:
- lock a file using the lock icon;
- Copy the link, download it, or remove it from the record .
If you remove a file from record file will still remain saved in Medialibrary. You can also perform these same actions by opening the file.

Online
The Online section contains links, channels, and websites where the event has been posted and/or shared.
From here, you can check where the event is listed online, such as within the Network, on websites linked to Artshell, or in the exported sharing links.
For more information on how to publish events, see the article “The Publish Feature for Events.”
If you'd like to know how to generate a shareable link, see the article " Exporting and Sharing Events."
For each item, some useful information is provided to help you identify it and check when it was last updated.
Channels
For content published on the Channels, the following are displayed:
- Image - the image associated with the channel, as set under Network >> Network Profile.
- Channel name - the name of the channel where the content was published.
- Date - the day, month, year, and time of the last publication or the last synchronization.
Websites
For content published on the Websites, the following are displayed:
- Image - The image associated with the website that was set when you configured the site with the Artshell team.
- Website Name - the name of the website where the content was published.
- Date - the day, month, year, and time of the last publication or the last synchronization.
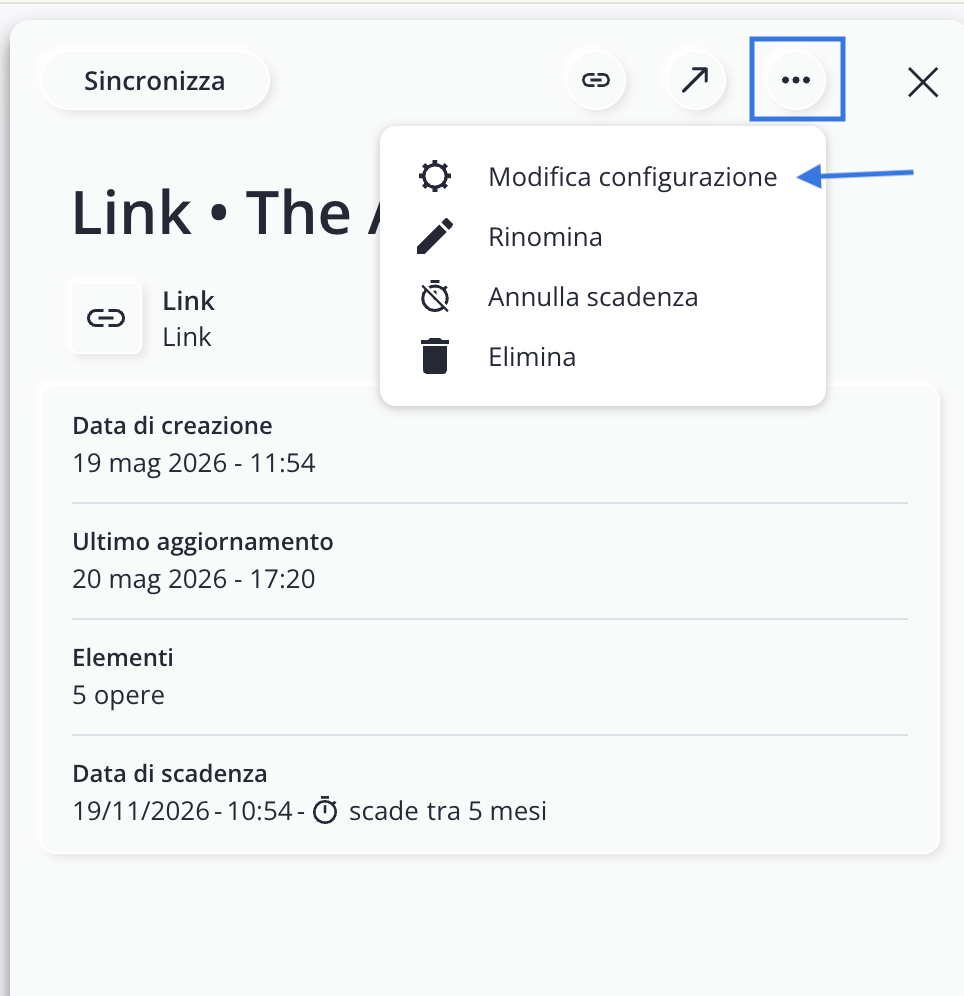
Link
For content shared via an exported link, the following are displayed:
- Image - the image specified in the Metadata section during link setup.
- Link name - the name entered in the " Link Title" field in the " General Settings " section of the link configuration.
- Date - The day, month, year, and time of the last publication or the last synchronization.
By clicking the icon you can open, copy, or delete a link The same actions can be performed in the Websites section. However, you cannot open or copy the link for shares on channels; for those, you can only remove them from the post.
If you've edited the record after publishing or sharing it, you can use the Sync button to update the online version.
In the following paragraphs, you’ll find detailed information on how the “Sync” button works for links and shares on your Network profile.
In fact, when an event is published on a website, there’s no need to distinguish between a new post and a sync. After the initial publication, any subsequent changes can be posted online using the “Sync” feature.

Synchronize an event that has already been published or shared
After generating a link, you may need to correct a typo or update information that is already included in the shared version of the event.
In these cases, you can use the Sync feature, which allows you to update the existing link without creating a new one.
Synchronization only works for content that was already included in the link's initial configuration. For example, if you included the title, description, times, or images in the link, you can correct or update this information in record and then synchronize the link.
To do this:
- Open the record in edit mode ;
- Update the necessary information and click Save;
- Then go to the " Online " section of the "Details" tab;
- Click " Sync " to update the online version.
Edit the settings for a shared event
If you want to add content that was not included in the initial configuration, simply synchronizing from record is not enough.
For example, if you did not select any images, videos, folders, files, or other sections of the Details tab when you created the link, this content will not be added to the link through simple synchronization.
In this case, go to the Export section and edit the link settings.
To do this:
- Open the Export section ;
- Search for the link using the search bar or use the available filters;
- Click the icon ;
- Select Edit Configuration;
- Include the missing content by selecting it manually or using the toggles;
- Click " Synchronize " to update the link with the new configuration.
When to create a new link
If you want to create a different version of the same event—for example, with a different selection of content or tailored for a different audience—we recommend creating a new link.
This way, you can keep the link you've already shared active and create a new version with a different configuration, without changing the previous one.
Reservations
In the Reservations section, you can keep track of the registrations received for the event.
This section allows you to view information about registered users and track event attendance, provided that booking management is enabled.
Conclusions
The "Details " tab of record allows you to manage all content related to the event in one place: Artworks, media, folders, attachments, files, online publications, and reservations.
Using it correctly helps you keep your record complete, organized, and ready to be shared or published on channels linked to Artshell.
Be sure to check out the upcoming articles about the record as well: